Relay Server
A Relay Server acts as a secure communication bridge between mobile devices and the SureMDM server, ensuring stable data transmission even in low-network environments. Operating as an internal service within the firewall, it supports devices on the local network and enables efficient file distribution using SFTP or FTP protocols. By serving files locally, it significantly reduces internet bandwidth usage, especially when multiple devices need to download the same content.
Configuration of Relay Server Connector Microservice (RSCM)
The SureMDM Relay Server Connector is a microservice that runs in the same network as the relay server. It manages all communications and file transfers between the relay servers and the SureMDM server. The primary role of the RSCM is to receive files from the SureMDM server and upload them to one or more relay servers.
Relay Server does not require open incoming ports.
Prerequisites
Relay Server Connector Microservice is supported on Windows OS and runs as a Windows service.
- Windows OS with FTP/SFTP support and a minimum 2-core CPU and 4 GB of RAM
- ASP.NET Core 6 Runtime.
- Microsoft.NET Core 6 Runtime
- Microsoft Windows Desktop Core 6 Runtime
- FTP/SFTP servers must be on the same network as the other devices
- Each location should have one Relay Connector
Installation of Relay Server Connector
To install Relay Server Connector for Windows OS, follow these steps:
Double-click RelayConnector.exe to install it in admin mode.
Follow the instructions in the wizard to complete the installation.
Once the installation is complete, a command prompt will appear to enter the SureMDM server configuration details:
 |
|---|
- Enter the following details in the configuration screen:
Relay Connector Name: Enter a name for the Relay Connector. This name will automatically become the server name.
SureMDM Server Address: Enter the URL for your SureMDM instance starting with https. For example: https://suremdm.42gears.com
Secret Key: Enter the pre-shared encryption key. It will be used to encrypt the communication between RSCM and the SureMDM Server.
The value of this key can be found in SureMDM Console > Account Settings > Relay Server > Pre-shared key
 |
|---|
- Account Id: Enter the SureMDM Account Id. It can be found in the SureMDM Console settings panel.
Close the prompt after entering the details. The service will run in the background.
The relay server details will be displayed in the Relay Connector List.
To view the current relay server configuration, open the command prompt in admin mode and run the following command:
C:\Program Files (x86)\Relay Connector\Execute
RelayConnector.exe --show
To update the installed relay server configuration, open the command prompt in admin mode and run the following command:
C:\Program Files (x86)\Relay Connector\Execute
RelayConnector.exe --configure
Configuration of Relay Server
Prerequisite
The Relay Server Connector must be installed on a windows machine that has network access to the relay server.
To configure Relay Server, follow these steps:
Log in to the SureMDM Console.
Navigate to Settings > Account Settings > Relay Server > Relay server mapping.
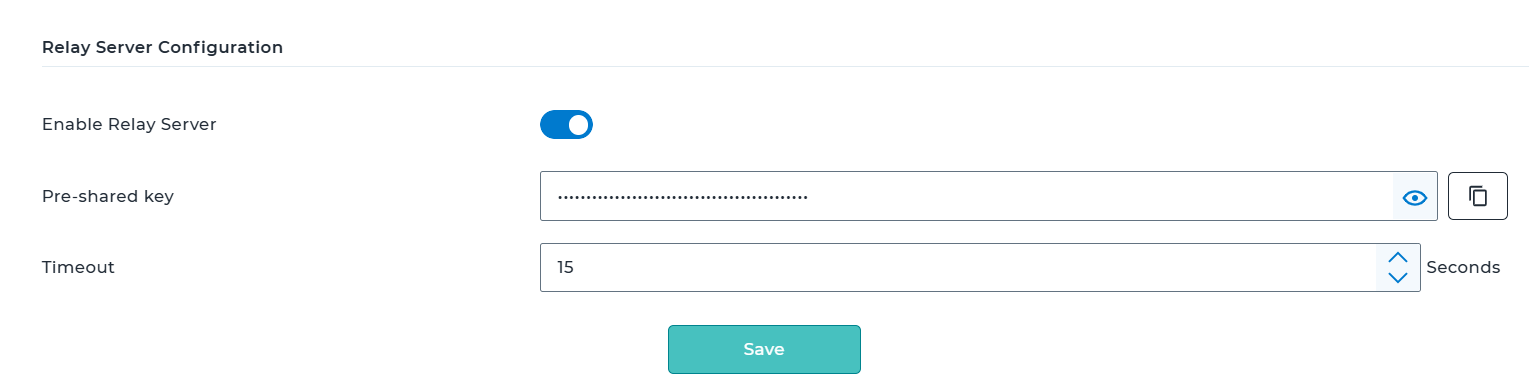
Configure the following settings:
- Enable Relay Server - Enable/disable the relay server
- Enable Fall Back - Enable/disable fallback
- Pre-Shared Key - Enter your pre-shared key
- Timeout - Enter the time in seconds
- Click Save to complete the configuration.
Add Relay Server to the SureMDM Console
One or more relay servers can be added to the SureMDM Console, either individually or in bulk by importing a CSV file.
To add a Relay Server to the SureMDM Console individually, follow these steps:
Log in to the SureMDM Console.
Navigate to Settings > Account Settings > Relay Server > Relay server mapping.
On the Relay Server Configuration screen, click Add.
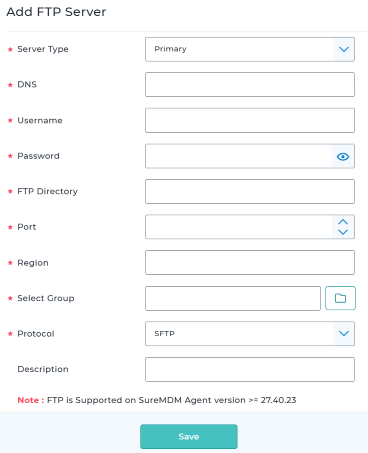
Configure the following details in the Add Server prompt:
- Server Type - Select the server type from the dropdown. This option allows you to select either Primary or Secondary server types.
- DNS - Enter the IP address of FTP/SFTP type.
- Username - Enter the user name.
- Password - Enter the password.
- Base Path - Enter the base path of the relay server.
- FTP Directory - Enter the FTP directory path.
- Port - Enter the port of the relay server.
- Region - Enter the region of the relay server.
- Select Group - Select the device group to which the relay server will add.
- Protocol - Select the protocol type from the dropdown. This option allows you to select either FTP or SFTP type.
- Description - Enter the description of the relay server.
 |
|---|
- Click Save to add the relay server.
Relay Server List
This helps to view the Relay Servers added to the SureMDM Console. The following actions can be performed on the relay server section:
- Add – Adds new relay servers
- Edit – Modifies the details of existing relay servers
- Delete – Removes selected relay server
- View – Displays error messages for the selected relay server
- Refresh – Updates and reloads the relay server list
- Download Template – Downloads the CSV template used for importing relay servers
- Import CSV – Uploads the completed template to import multiple relay servers at once
Sync job created in the SureMDM Console to the Relay Server
Log in to the SureMDM Console.
Navigate to Jobs and select any of the created Install Job or File Transfer Job from the list.
Only the Install Job and File Transfer Job are supported. Click here to get more information on creating an Install/File Transfer Job.
Click Relay Status.
The Relay connector list will be displayed.
Select single or multiple relay connectors based on requirements and click Sync.
The syncing process may take some time, depending on the file size. The Job and the Relay Connectors will be synced.
Deploy Jobs from Relay Server to Individual Devices
Once the Job and the Relay Connectors are synced, Go to the SureMDM Home page, select the required device, and click Apply.
In the Apply Job/Profile to Device screen, choose the specific Install or File Transfer Job, and click Apply.
Once the Job is successfully deployed, verify it by following these steps:
Click Job History > Completed Jobs > Click on the specific Job Status.
Check the status in the Download Source Grid.
- If the Job/File is being downloaded from the Relay server, it will show the details with the IP address.
- If it is downloaded from the cloud, it will show "NA".
Sync Jobs from Relay Server to Multiple Groups in SureMDM Console
To sync Jobs for Multiple Groups in SureMDM Console, follow these steps:
Navigate to the SureMDM Console and select a Group.
Go to Properties > Assign Jobs/Profiles > Assign.
Add the required File Transfer/Install Application Jobs > click OK.
Select the added Job and click Sync.
The Sync option will be available only if the group is configured during relay server configuration.
Once the Jobs are synced, Go to the SureMDM Home page.
Select any device > Move to Group > select specific group > click Move.
After the device is moved, the default Jobs assigned to that group will automatically be applied to the device.
View Relay Server Logs
This report provides a comprehensive overview of all activities across the relay servers. It includes detailed information such as time logs, message logs, and other relevant data. Administrators can use this report to monitor relay server operations and performance, identify issues or anomalies, and make informed decisions to optimize performance and ensure smooth, uninterrupted operations.
To view the Relay Server Logs, follow these steps:
- Navigate to SureMDM Console > Relay Server > Relay Server Mapping.
- Select Relay Server from the Relay Server List.
- Click View.