Introduction
SureMDM offers InLocate a powerful Indoor Location Tracking feature, designed to monitor asset locations within indoor environments. This feature is an extension to our existing Location tracking feature, It enables monitoring, tracking, and managing the location of devices within a premise seamlessly.
Traditional asset-tracking solutions often struggle to provide accurate location information indoors, leading to inefficiencies in resource allocation, logistical planning, and overall operational management. With InLocate we aim to solve this by offering a comprehensive solution that enables businesses to precisely monitor asset locations in real-time, thereby optimizing asset utilization, improving inventory management, and enhancing overall operational efficiency within indoor spaces. By providing accurate indoor location tracking capabilities, InLocate empowers businesses to make informed decisions, streamline workflows, and maximize the productivity of their indoor operations.
Getting Started
Configuring InLocate is divided into three sections:
Configuring SureMDM Console
- Enabling InLocate
- Design Mode
- Adding Calibration User
Calibration of POIs
Real-time Tracking
Configuring SureMDM Console
Enabling InLocate - Enabling the new Indoor location tracking feature on the SureMDM web console:
Login to the SureMDM Console.
Go to Settings and click Account Settings.
Click InLocate.
Enable the Indoor Location Tracking checkbox.
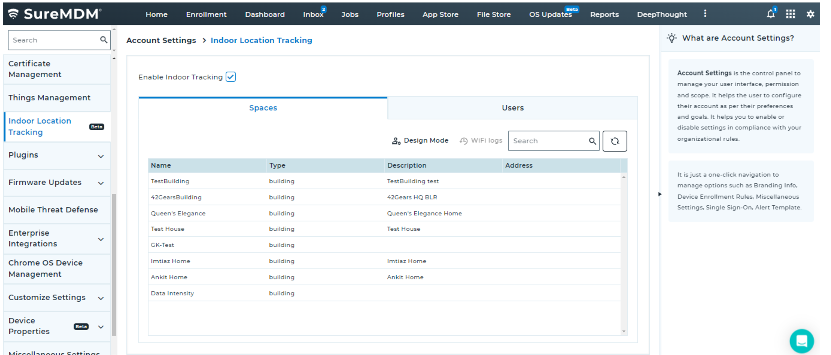
After enabling the Indoor Location Tracking, navigate to the spaces tab and click Design Mode.
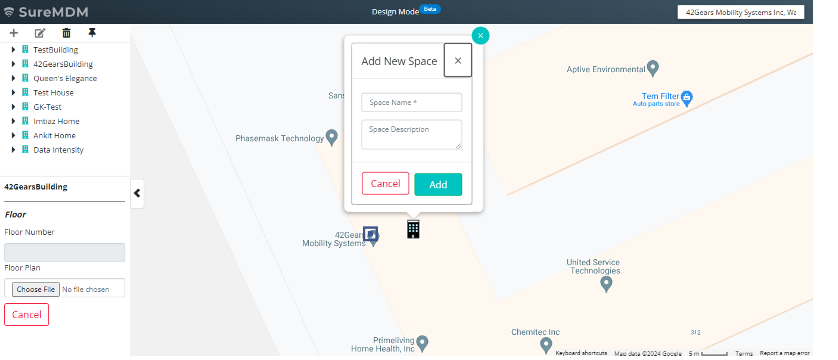
Enter the name of the desired vicinity of desired premise in the search bar at the top right to pan the map to show the entered vicinity.
Right-click at a desired point on the map to Create a New Space, enter Name and description on the pop-up, and click Add.
Design Mode > Adding Floors - Adding different floors of the respective Space.
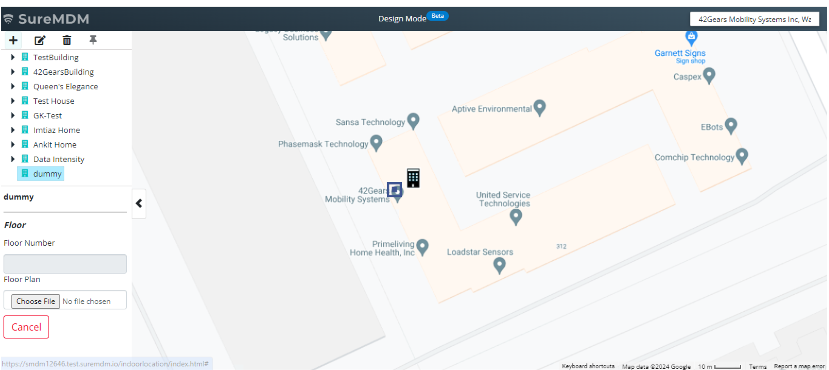
On the left panel select the required space and then click “+” icon to add a floor to the selected space.
Assign a Floor Number and click Choose File to upload the floor plan image.
Position the floor plan image according to the orientation of your building and align it perfectly.
To maintain the high zoom clarity, ensure you are adequately zoomed into the map and please use a high-definition floor plan image before you save the floor.
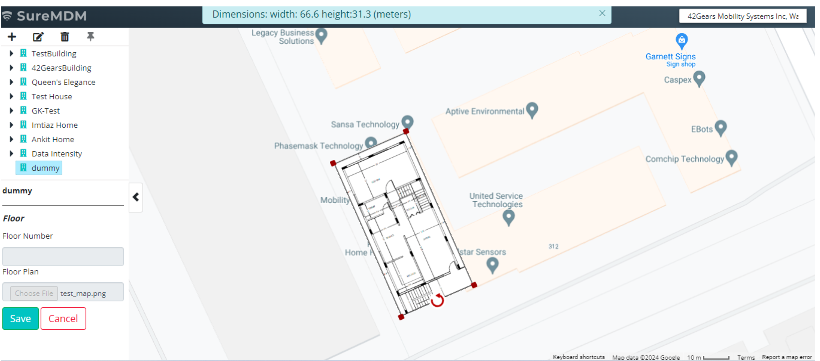
Click Save and wait for the successfully uploaded message to appear.
You should now be able to see your floor plan on the map. If not, please refresh the page once and then click on your space to see the uploaded floor plan.
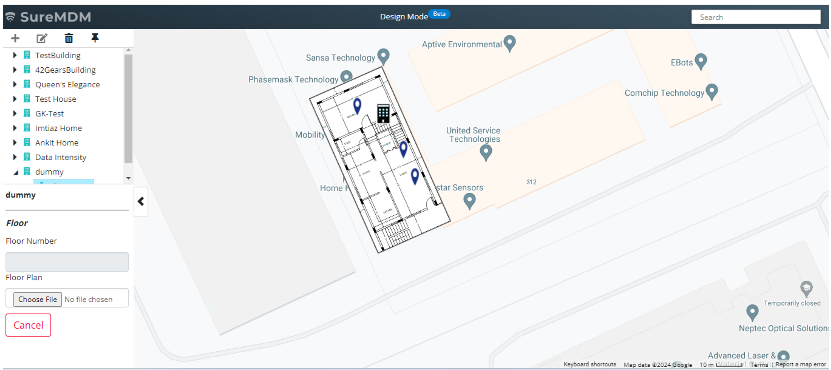
Design Mode > Adding POI. - Adding points of interest on the uploaded floor plan. It can be a room, an organization-specific portion of the floor, an access point, or a device cradle. Recommendation: For best accuracy, we recommend configuring POIs separated by an 8-10 meter distance covering the entire floor. The accuracy of InLocate may be negatively affected in the case of too many or too less POIs.
- Click on the Pin icon and drag it anywhere on the floor plan to add POI (Point of Interest).
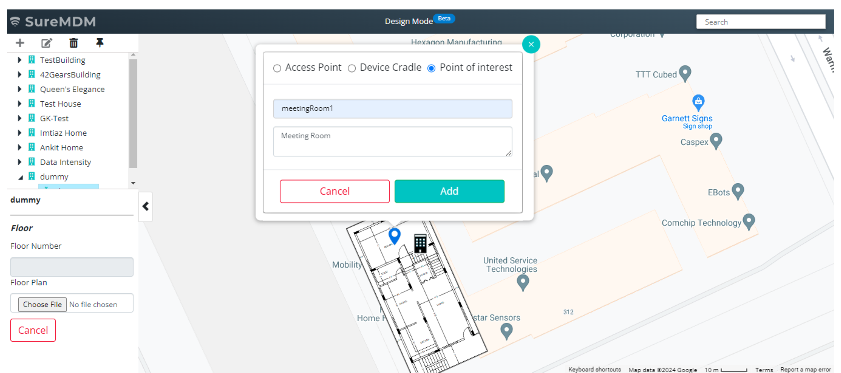
On the pop-up select POI type as Point of Interest, add Name, and Description of the POI.
Similarly, add all the required POIs on the floor plan.
- Import option allow users to upload space configuration data into the system.
- Export option allow users to download the existing space configuration data.
- WiFi Logs displays WiFi scan logs used for indoor location tracking and provides options to Enable, Disable, or Re-Analyze the log(s).
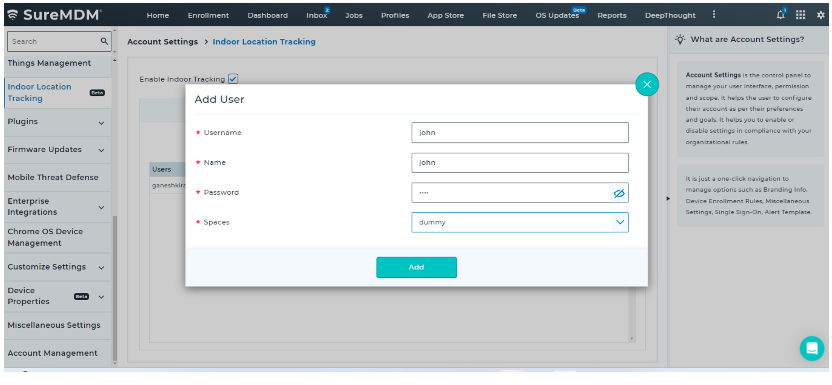
Adding Calibration Users - Adding users who will be authorized to access the specific Space and its POIs using the InLocate Calibrator application.
Navigate to Account Settings -> Indoor Location Tracking.
Click on the Users tab and add a user to register a new user for calibrating the POIs.
If your infrastructure supports RTT-capable endpoints and WiFi modules/routers and you have configured the RTT-capable WiFi access points as POIs using the MAC address of the access point, the calibration step would not be required.
Calibration of POIs
Calibration for indoor location information involves accurately mapping Points of Interest (POIs) which are added on the map to their actual locations. This process requires physically moving the calibration device to the designated location and capturing the necessary data, typically using WiFi signals. This calibration process is a one-time requirement and each POI placed on the map must be calibrated.
To calibrate the mobile device at each POI, follow these steps:
- Install the InLocate Calibrator application using the Install InLocate Calibrator job from Jobs > Auto Created Jobs in the SureMDM console.
This app is typically installed on a dedicated calibration device used to complete the one-time setup process. Multiple devices can be used for calibration to improve accuracy across different device models.
Open the app, enter the Server Path (console URL), User Name, and Password that were created while adding the calibration user.
Click the Select Building button at the bottom to select your building.
Select your Building, and Floor, and then click Load Building Floor.
 |
|---|
Physically navigate to the POI (blue markers), keep your device steady, and click on the respective POI.
A dialog box will appear for the calibration confirmation, enter the calibration durations and click Yes to proceed.
Place the device in the same location for the calibration duration until calibration is complete.
 |  |
|---|
When calibration is completed, a Upload Data dialog box appears.
Click Upload to upload the calibration data to the SureMDM console.
To improve the accuracy of indoor location tracking, we should calibrate all the added POIs.
 |  |
|---|
Similarly, you can calibrate all the POIs.
Click on the three dots at the top right corner and exit from the calibration app once complete.
By adhering to these steps, you ensure that each POI is accurately calibrated, and the updated data is uploaded to the server, enhancing the accuracy of location tracking and mapping.
Real-time Tracking
After setup, administrators can monitor the real-time location of configured endpoints on the map. They can enable indoor location tracking for specific endpoints. Utilizing the locate functionality on the SureMDM console allows viewing a map featuring configured spaces, floors, POIs, and a list of location-enabled endpoints. If endpoints are within the configured premises, the indoor map displays the accurate device positions. Administrators can also track the location history of enabled endpoints. This overview emphasizes the comprehensive tracking capabilities within SureMDM for managing endpoint locations effectively.
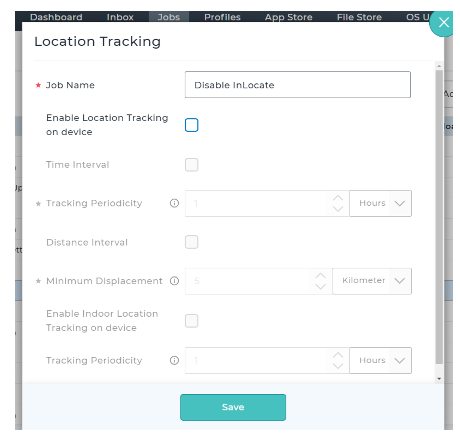
Create the following jobs on the SureMDM console:
- Disable InLocate - This job ensures the previous location tracking deployed on the device is cleared.
Navigation: SureMDM Console > Jobs > New Job > Location Tracking
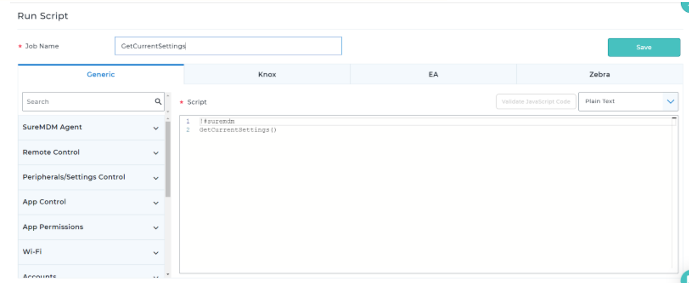
- GetCurrentSetings - This Run Script job fetches the latest indoor location information from the device.
Navigation: SureMDM Console > Jobs > New Job> Run Script
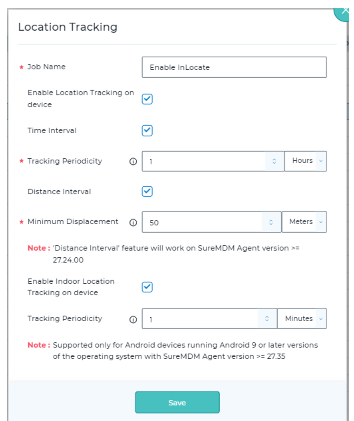
- Enable InLocate - This job enables location tracking on the device and specifies the tracking specifications.
Navigation: SureMDM Console > Jobs > New Job > Location Tracking
To track the required device location, follow these steps:
- Open the SureMDM web console, search your device, and deploy previously created jobs 1, 2, and 3 on the device one after the other in the same order.
The next job should be applied only after the successful completion of the previous job.
- Select the specific device, then click Locate again to track the device indoors and view its history.
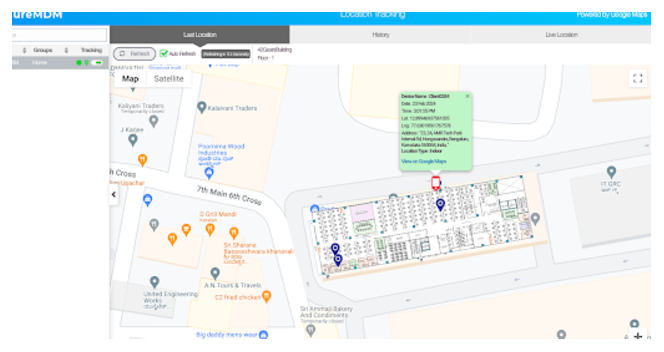
Expect accuracy of 4-5 meters and latency of 2-3 minutes on the map relative to the actual location of the device.
If indoor location tracking is enabled for an endpoint and it is inside the designated space, the tracking will switch to indoor mode. However, if the endpoint is outside the designated space, the existing location tracking method will remain active.