Link ABM with SureMDM
In order to perform MDM functions on enrolled iPads, iPhones and Mac OS, the ABM account has to be linked with SureMDM. For linking, a certificate is required which ensures a secure and trusted relationship between ABM and SureMDM. The following are the steps to get successful ABM linking:
ADE Profile and Server Creation
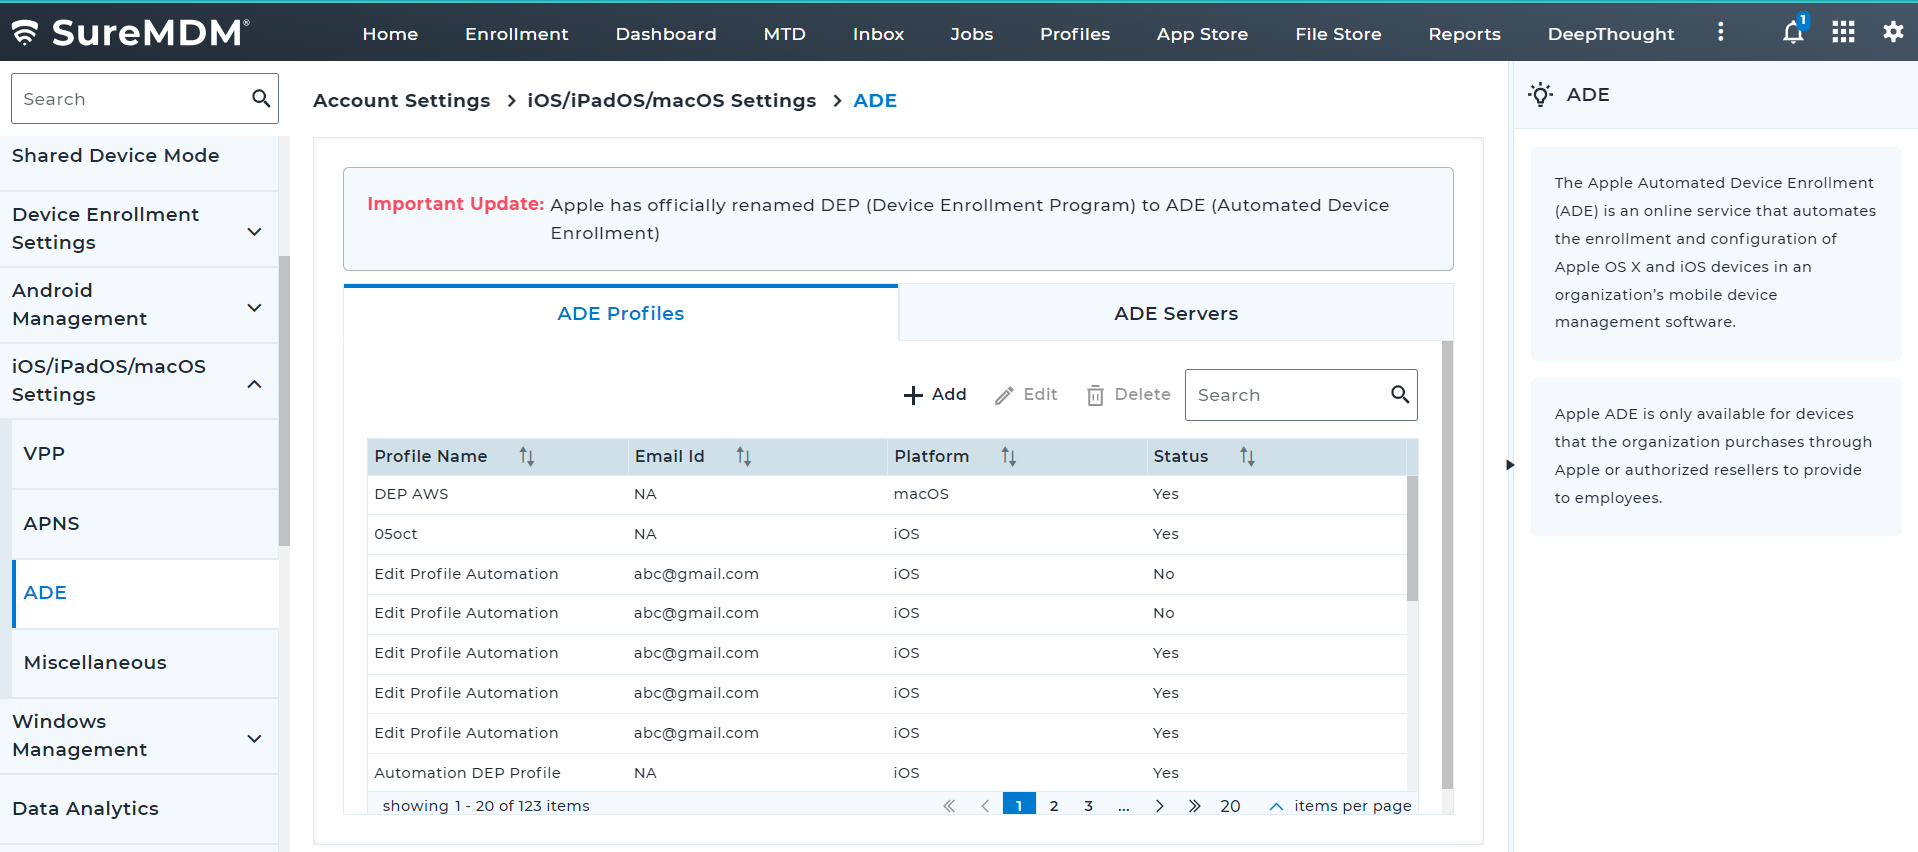
1. Navigate to SureMDM Settings > Account Settings > Apple Platform Management > ADE > ADE Profiles > Add.
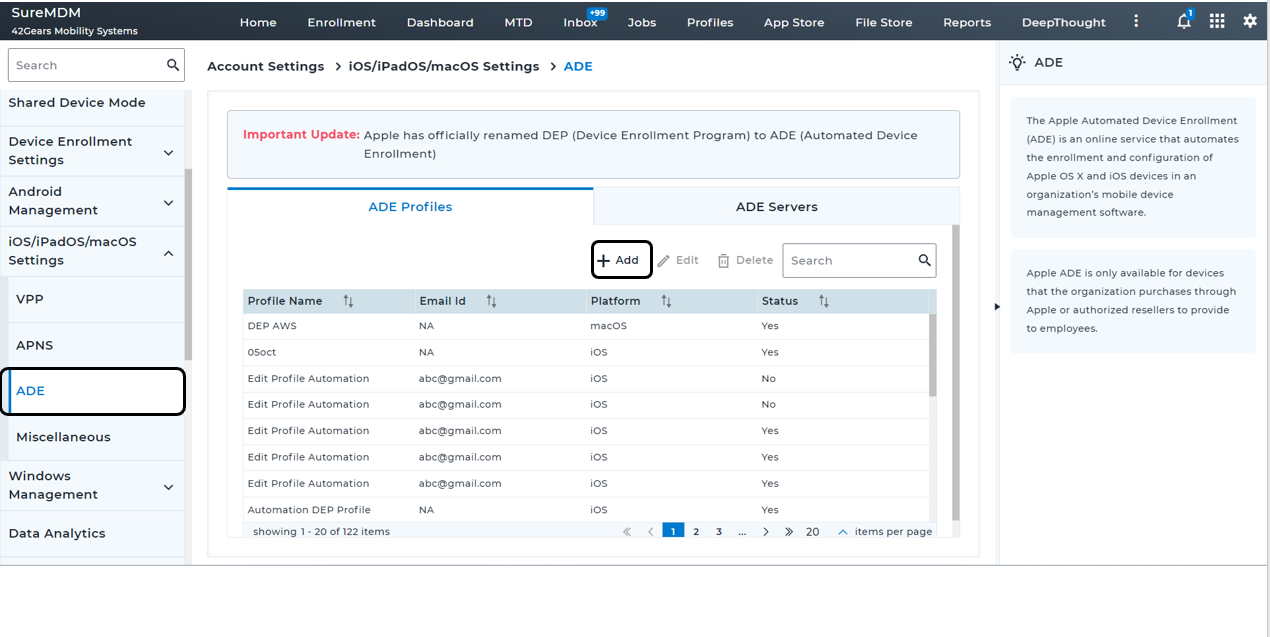
- Click Add. The ADE Profile creation popup screen appears.
Profile creation is categorized into three steps:
- Profile Details
- Setup Assistant Configurations
- Other Configurations
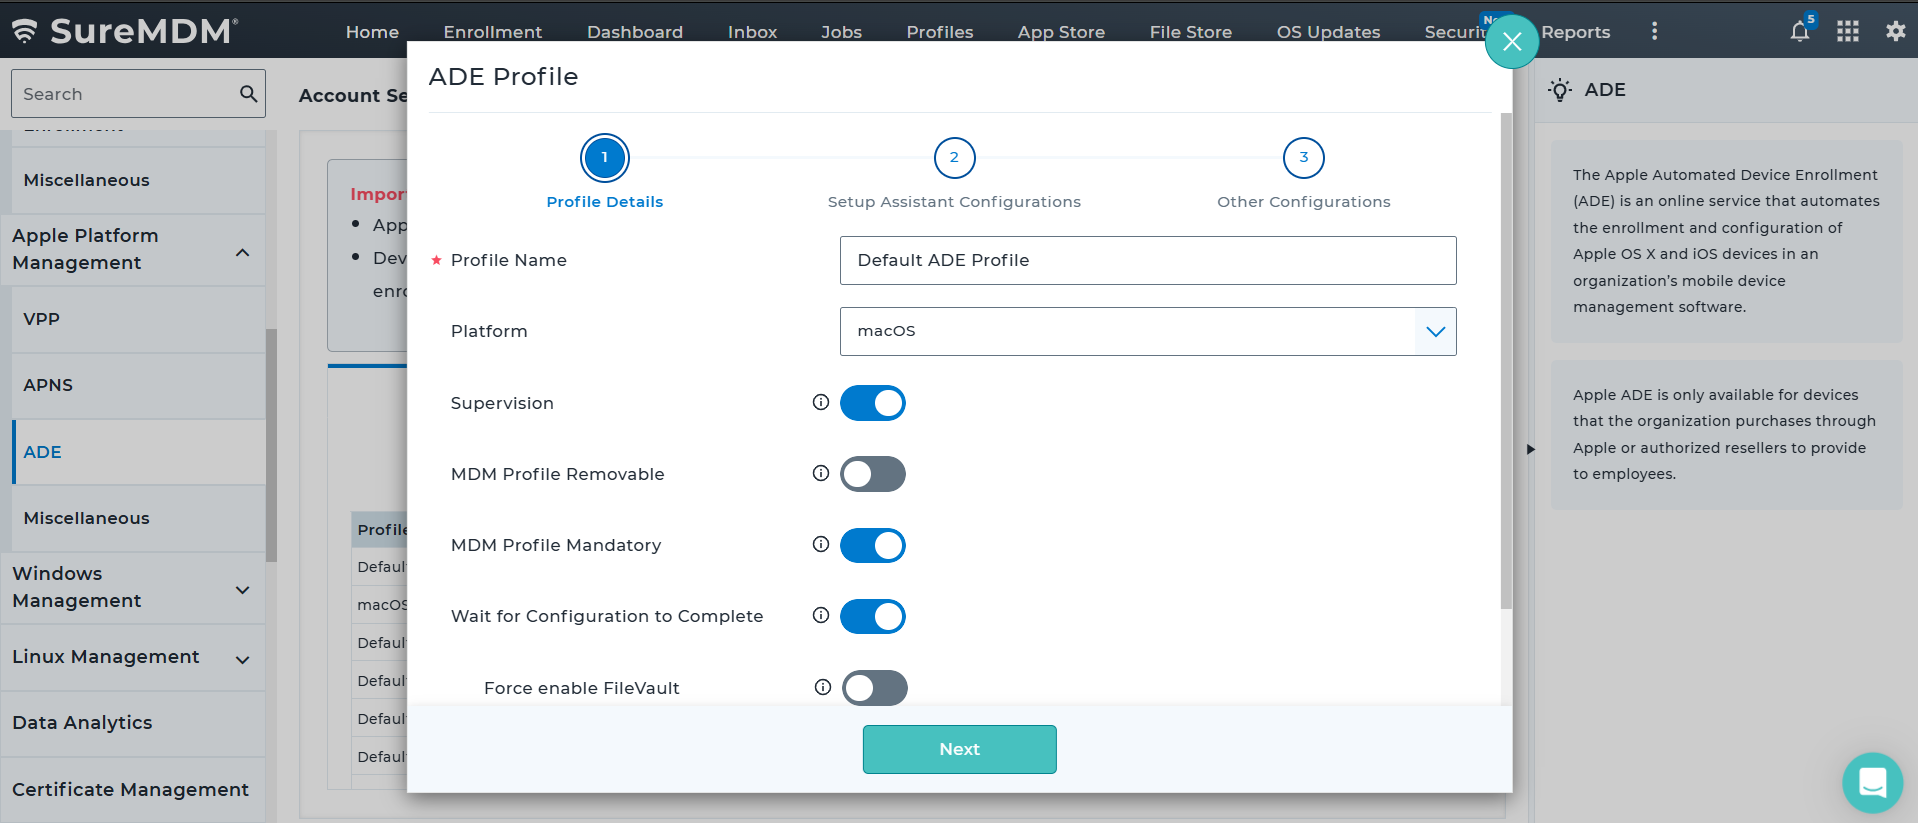
2.1 Profile Details
In the Profile Details section, configure the below options and click Next
| Settings | Description |
|---|---|
| Profile Name | Enter the name of the ADE profile |
| Platform | Select the platform as macOS |
| Supervision | Enable this option to enforce supervision during ADE enrollment. For macOS 10.15 and later, devices are supervised by default, so disabling this option will have no effect. |
| MDM Profile Removable | Disable to ensure that end users cannot remove the MDM profile installed on the device. Users can always remove the MDM profile for up to 30 days on devices enrolled in ABM, via Apple Configurator setting, regardless of this setting. |
| MDM Profile Mandatory | Enable this option to enforce user to apply MDM profile. |
| Wait for Configuration to Complete | If enabled, keeps the device in Setup Assistant mode until all resources are deployed from the SureMDM server. |
| Force enable FileVault | If enabled, FileVault will be enabled on the device. |
| Show Personal Recovery Key | If enabled, personal key would be displayed. |
| Minimum OS version | Configure the minimum OS version which should be enforced during the ADE Enrollment. - Not Configured: No Enforcement will be made during enrollment. - Latest Major Version: Devices will be updated to the latest available major OS version. If the latest major OS version is not compatible with the device, enforcement will be skipped. - Latest Minimum Version: Devices will be updated to the latest available minimum OS version. If the latest minimum OS version is not compatible with the device, enforcement will be skipped. - Latest Version based on device eligibility: Device will be updated to the latest OS version released for the desired devices |
| Select Group | Select the desired group in which the device should get enrolled. |
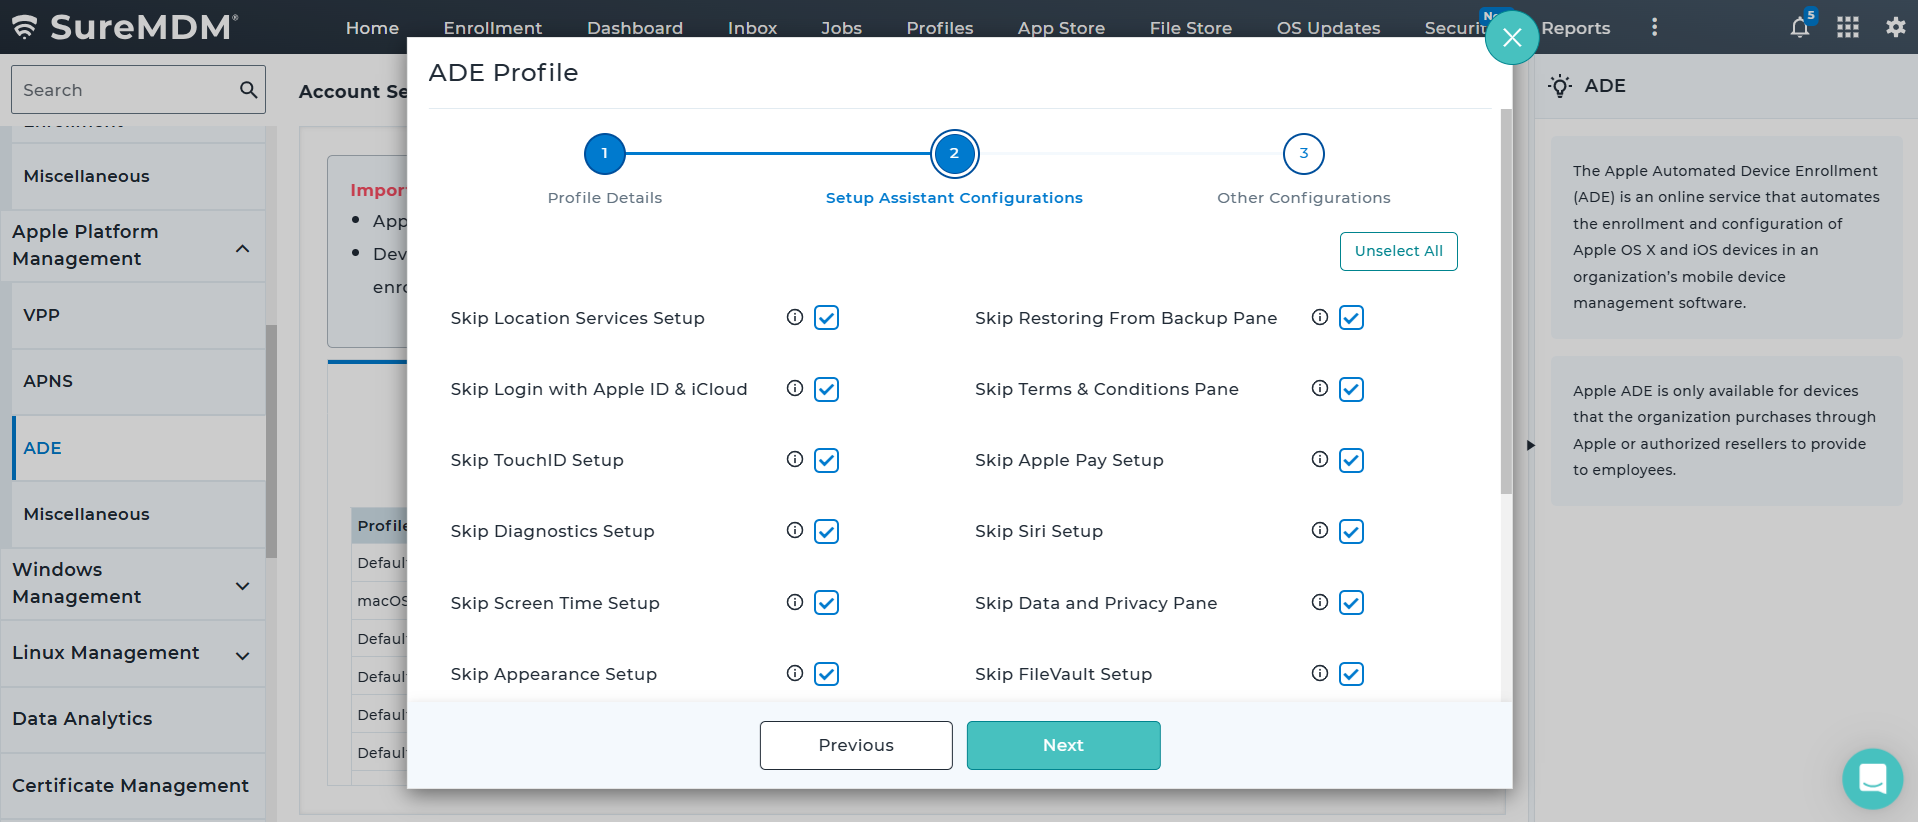
2.2 Setup Assistant Configurations
In the Setup Assistant Configurations section, select the necessary setup assistant keys and click Next
| Setup Assistant Keys | Description |
|---|---|
| Skip Location Services Setup | If disabled, macOS Setup Assistant prompts the user to enable or disable Location Services during enrollment. Available in macOS 10.11 and later. |
| Skip Restoring From Backup Pane | If disabled, macOS Setup Assistant prompts user to restore from backup during enrollment. Available in macOS 10.9 and later. |
| Skip Login with Apple ID & iCloud | If disabled, macOS Setup Assistant prompt user to sign in with an Apple ID and iCloud account during enrollment. |
| Skip Terms & Conditions Pane | If disabled, macOS Setup Assistant prompts user to read and accept the Terms of Use and Conditions during enrollment. Available in macOS 10.9 and later. |
| Skip TouchID Setup | If disabled, macOS Setup Assistant prompts user to configure Touch ID during enrollment. Available in macOS 10.12.4 and later. |
| Skip Apple Pay Setup | If disabled, macOS Setup Assistant prompts user to set up an Apple Pay account during enrollment. Available in macOS 10.12.4 and later. |
| Skip Diagnostics Setup | If disabled, macOS Setup Assistant prompts user to enable or disable sending diagnostic data to Apple during enrollment. Available in macOS 10.9 and later. |
| Skip Siri Setup | If disabled, macOS Setup Assistant prompts the user to configure Siri during enrollment. Available in macOS 10.12 and later. |
| Skip Screen Time Setup | If disabled, macOS Setup Assistant prompts user to configure screen time. Available in macOS 10.15 and later. |
| Skip Data and Privacy Pane | If disabled, macOS Setup Assistant displays the Data & Privacy page to user. |
| Skip Appearance Setup | If disabled, macOS Setup Assistant prompts the user to setup "Choose your Lock Screen" configuration. Available in macOS 10.14 and later. |
| Skip FileVault Setup | If disabled, macOS Setup Assistant prompts the user to configure the FileVault. Available in macOS 10.10 and later. |
| Skip iCloud Diagnostics Setup | If disabled, macOS Setup Assistant displays the iCloud Analytics screen to configure. Available in macOS 10.12.4 and later. |
| Skip iCloud Storage Setup | If disabled, macOS Setup Assistant prompts the user to configure the iCloud Documents and Desktop screen. Available in macOS 10.13.4 and later. |
| Skip AppStore Setup | If disabled, macOS Setup Assistant prompts the user to configure AppStore settings. Available in macOS 11.1 and later. |
| Skip Wallpaper | If disabled, setup assistant prompts for macOS Sonoma wallpaper setup pane after devices complete a software upgrade. Available in macOS 14.1 and above. |
| Skip True Tone Display Setup | If disabled, macOS Setup Assistant prompts the user to configure Display Tone setup. Available in macOS 10.13.6 and above, and deprecated macOS 12.0 and above. |
| Skip Lockdown Mode Setup | If disabled, macOS setup assistant prompts for Lockdown mode. Available in macOS 14.0 and above. |
| Skip Intelligence | If disabled, setup assistant prompts for configuring Intelligence Pane. Available in macOS 15.0 and above. |
2.3 Other Configurations
In the Other Configurations section, there will be four accordions available:
- Primary Account
- Admin Account
- Application Management
- Miscellaneous
Configure the required items and click Save.
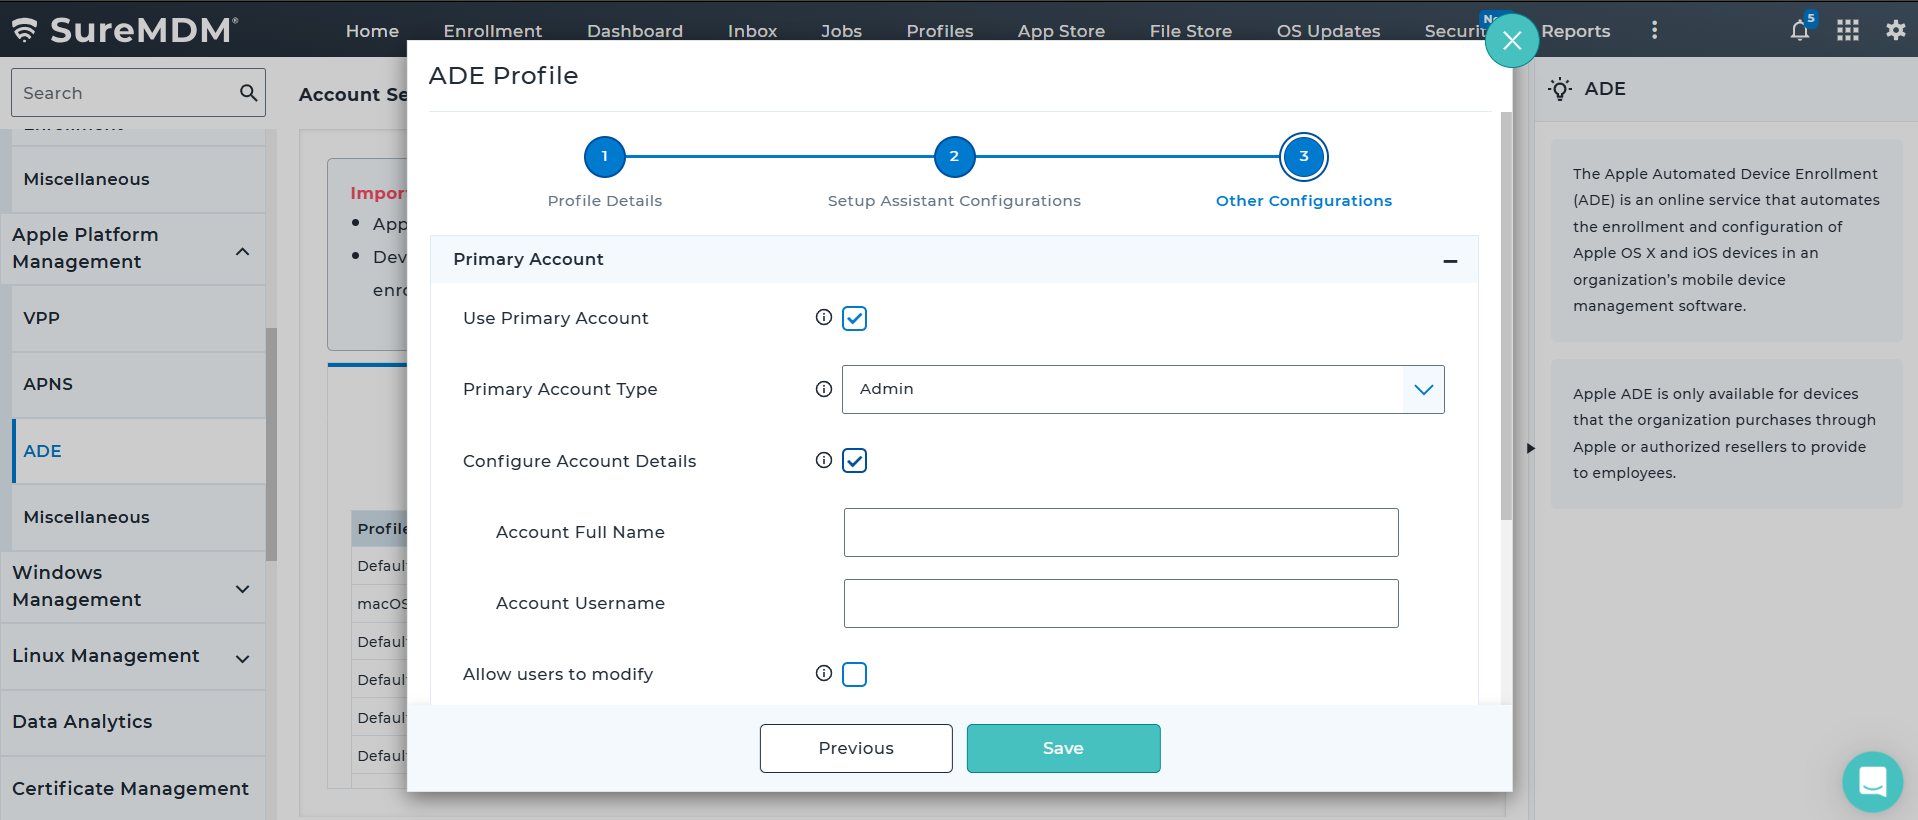
2.3.1 Accordion 1 - Primary Account
The Primary Account is the first user account created during the macOS setup assistant on a newly enrolled device. This account can either be a standard or an admin user depending on the configuration.
In the Primary Account section, configure the below options if required.
| Settings | Description |
|---|---|
| Use Primary Account | If checked, primary account will be created with specified configurations. Wait for Configuration to Complete should be enabled in order to create a Primary Account. |
| Primary Account Type | Select the Account Type. Admin Standard |
| Configure Account Details | If checked, below details can be configured - Account Full Name - Account Username |
| Allow users to modify | If checked, end-users can modify the Account Name and Username. |
If SAML authentication is not configured in the Device Enrollment Rules, enter the account details by enabling the Configure Account Details option.
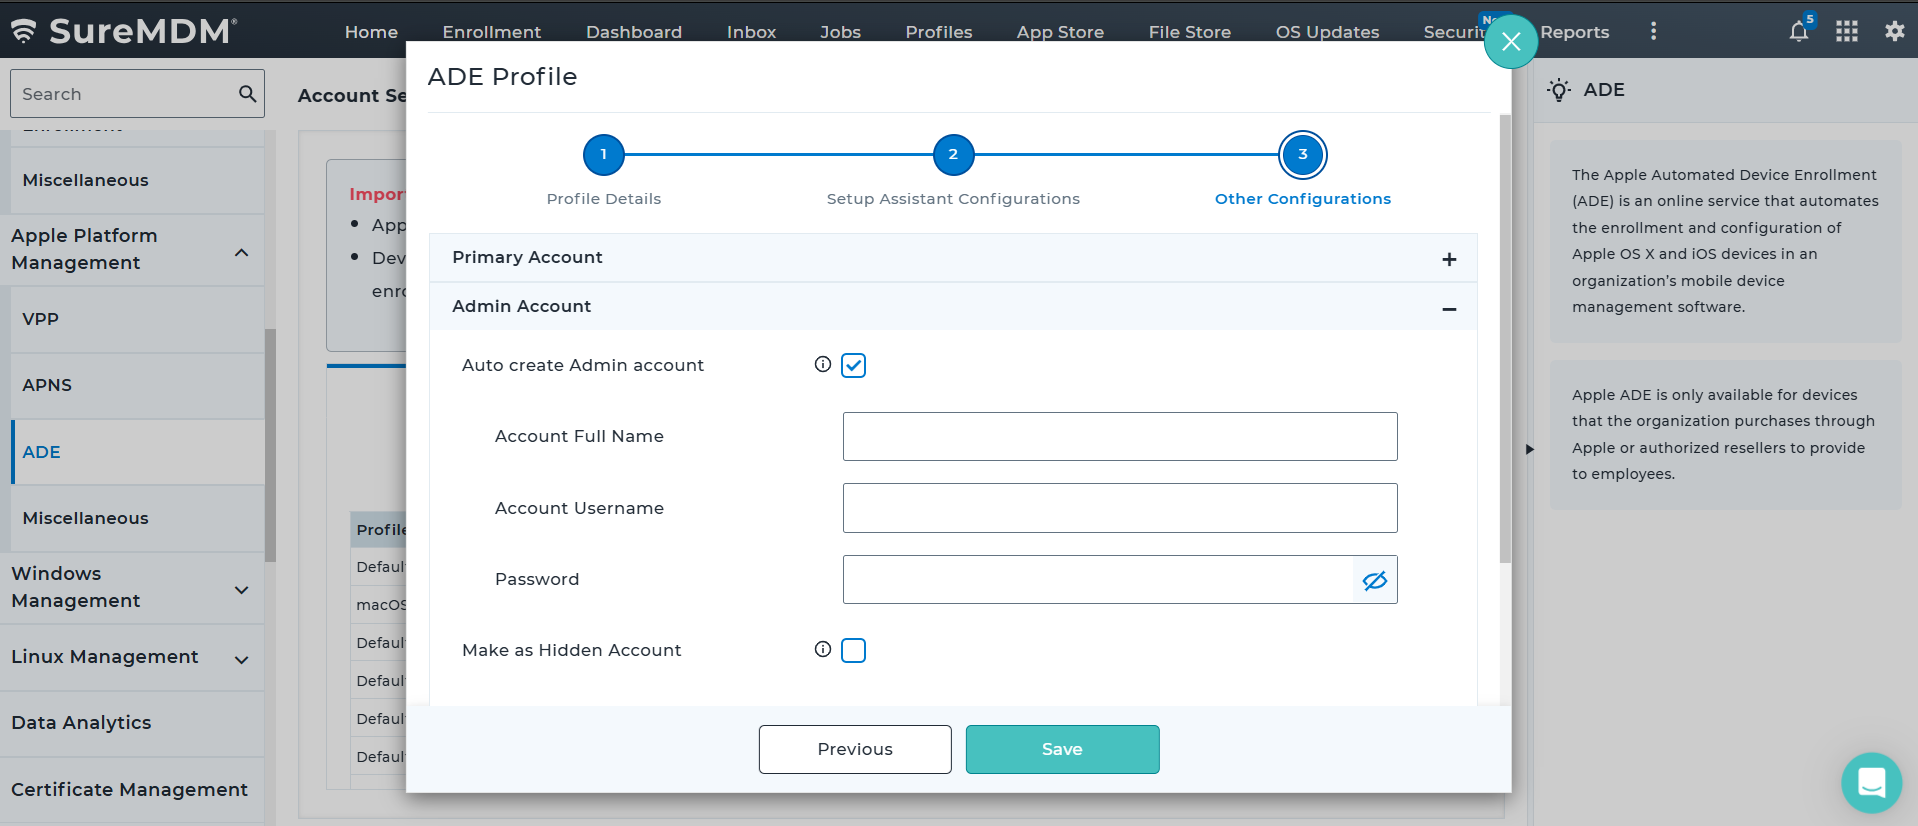
2.3.2 Accordion 2 - Admin Account
This is a separate admin account created silently post-enrollment. It’s often used for IT or support purposes. This is different from the primary user account and may not be visible to the end user if configured as Hidden Account.
In the Admin Account section, configure the below options if required.
| Settings | Description |
|---|---|
| Auto create Admin account | If checked, admin account will be automatically created at the time of device setup. Wait for Configuration to Complete should be enabled in order to create an Admin account. Below fields should be specified, - Account Full Name - Account Username - Password |
| Make as Hidden Account | If checked, the admin account will be created but won't be visible on the device. |
| Make as Managed User | If checked, the auto-created admin account will be marked as Managed/Enrolled User instead of the primary account that is created. |
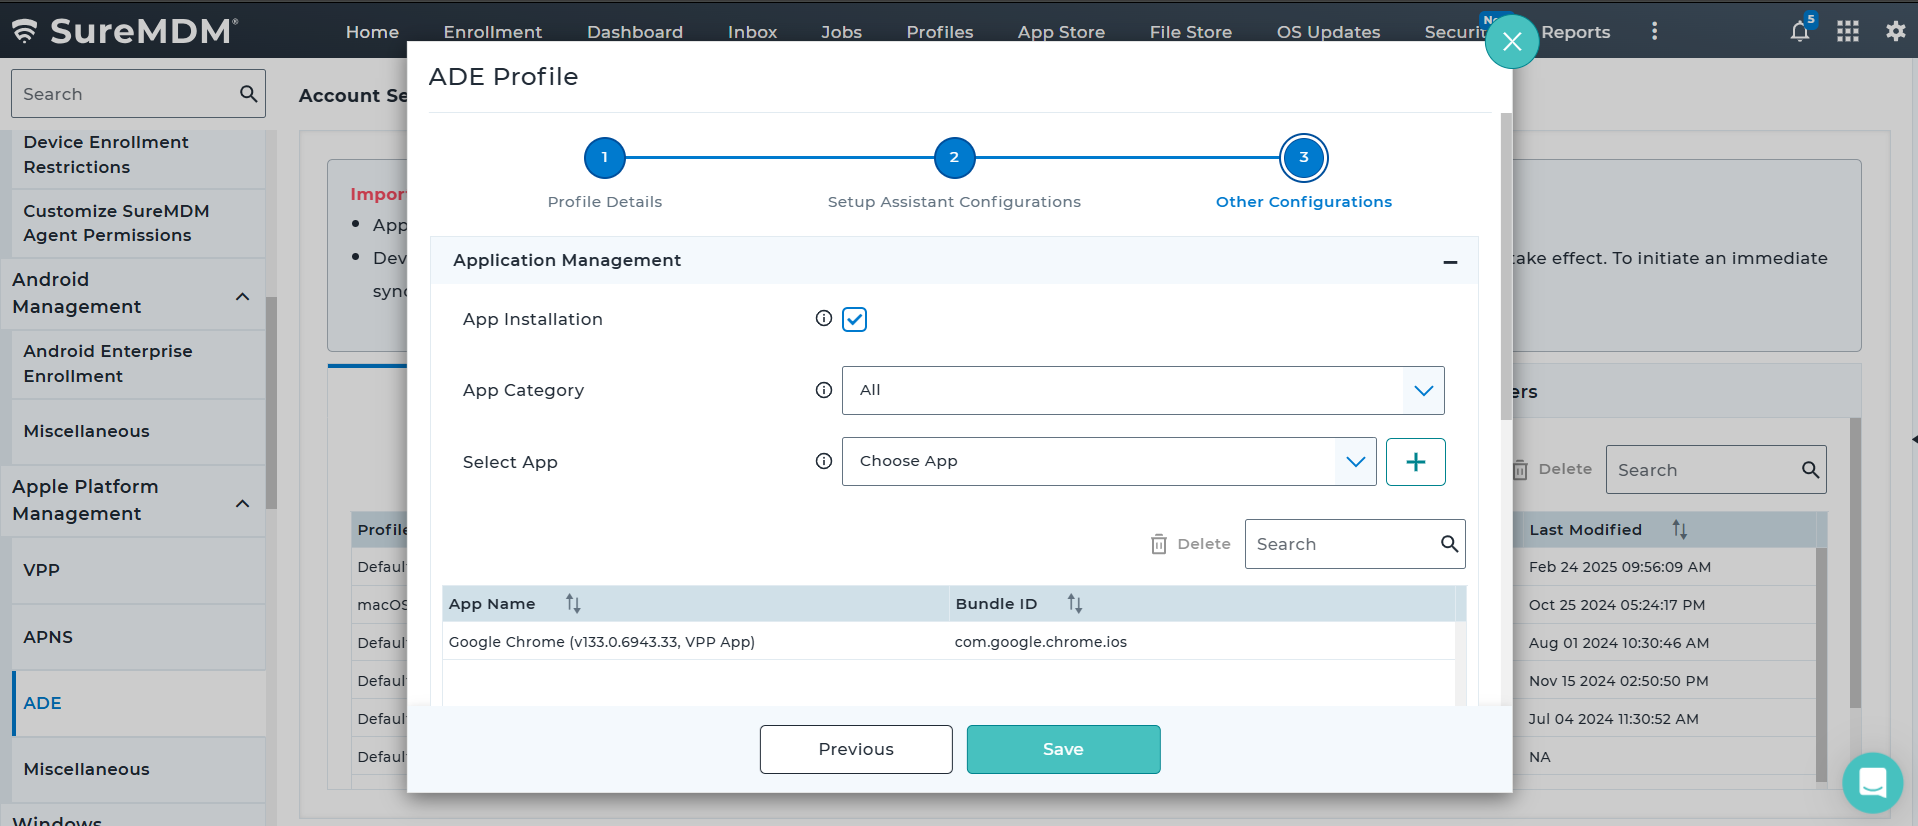
2.3.3 Accordion 3 - Application Management
In the Application Management section, choose the desired applications which should be installed post ADE enrollment process.
| Settings | Description |
|---|---|
| App Installation | If checked, configurations with respect to app installation can be managed. |
| App Category | Select the App Type. - All - VPP - .pkg |
| Select App | Select the app from the listing. Apps will be dynamically populated based on the chosen App Type. |
The added applications will reflect in the table section.
Note: During app installation, users will be allowed to access the device while the apps deployed during enrollment are being installed, ensuring an unrestricted setup experience.
2.3.4 Accordion 4 - Miscellaneous
In the Miscellaneous section, configure the below details.
| Settings | Description |
|---|---|
| Support Phone Number | Support Contact Phone Number will appear in the device's About Configuration panel upon setup and enrollment. |
| Support Email Address | Support Email Address will appear in the device's About Configuration panel upon setup and enrollment. |
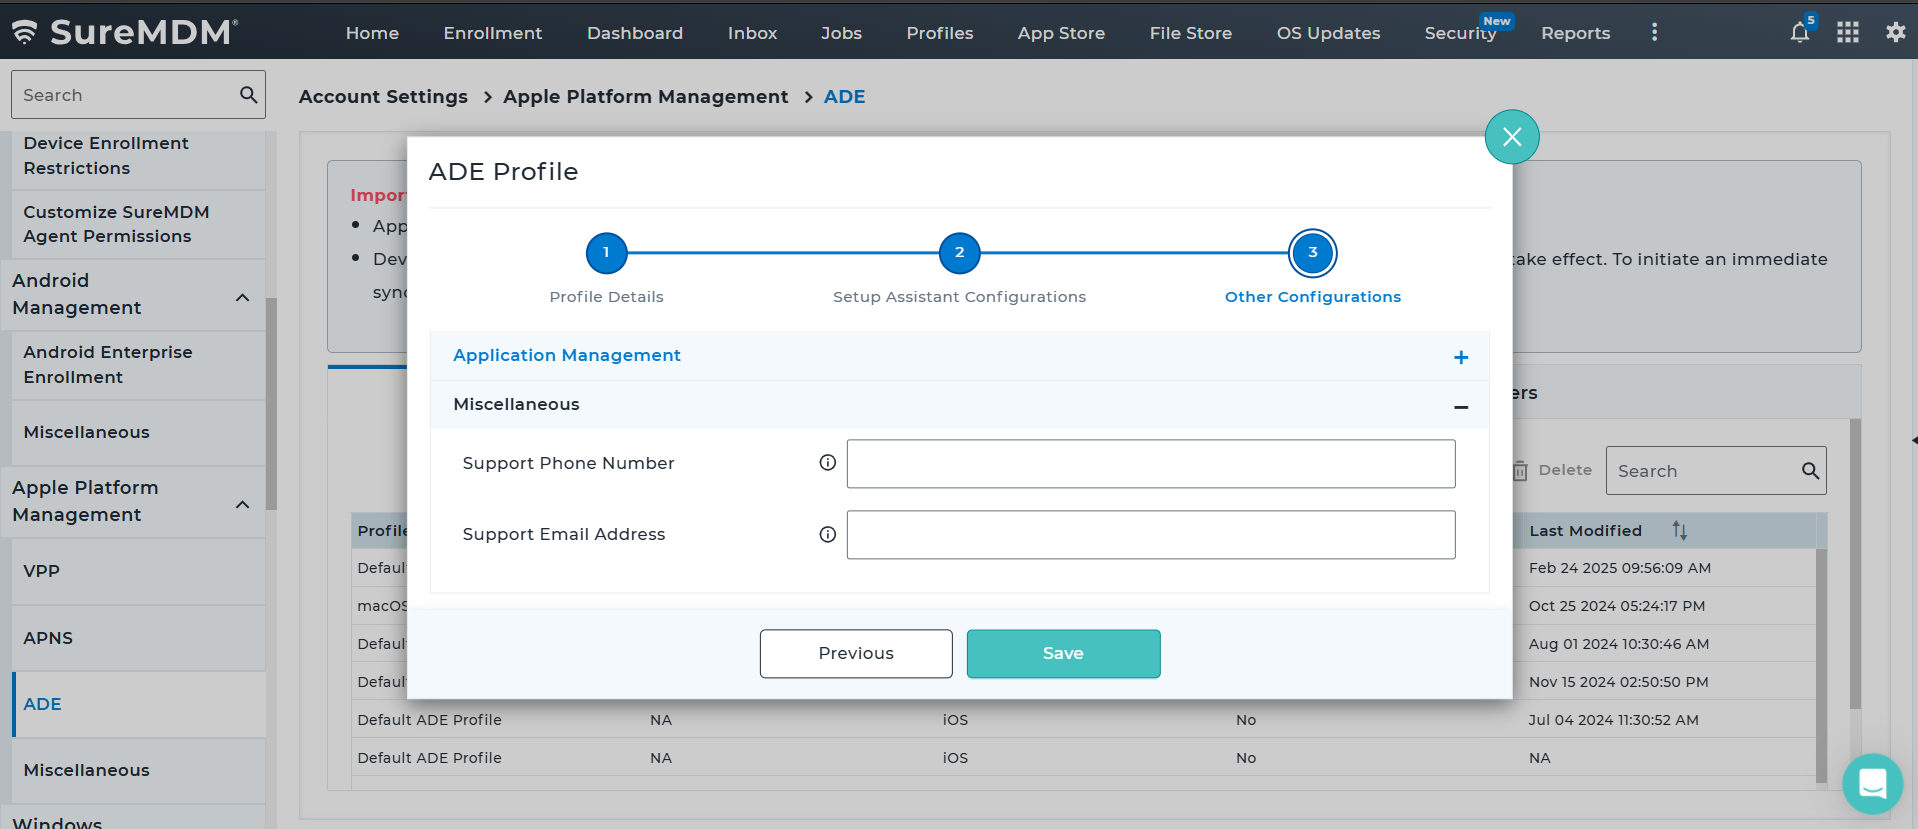
After completing the configurations, click Save to create the ADE Profile.
3. Once the ADE Profile is created, then it would get reflected in the ADE Profiles listing page.
4. Navigate to ADE Servers Tab and click Add
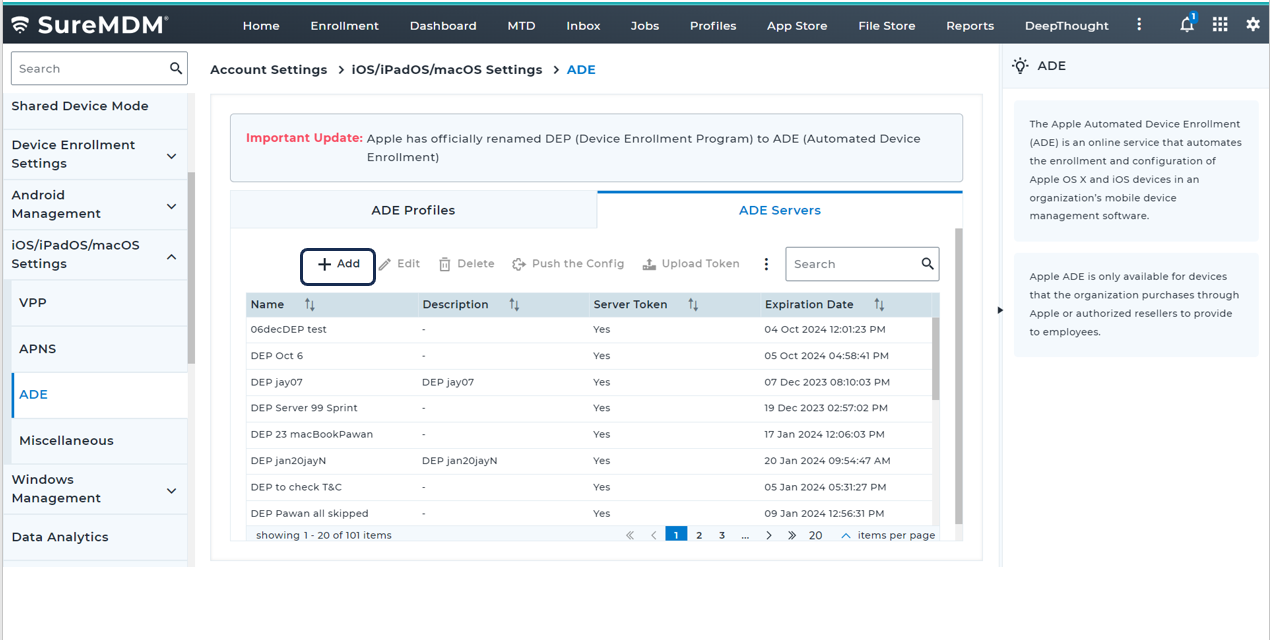
5. Once the Add is clicked, the below popup screen will appear, in which the following information should be provided and click Add.
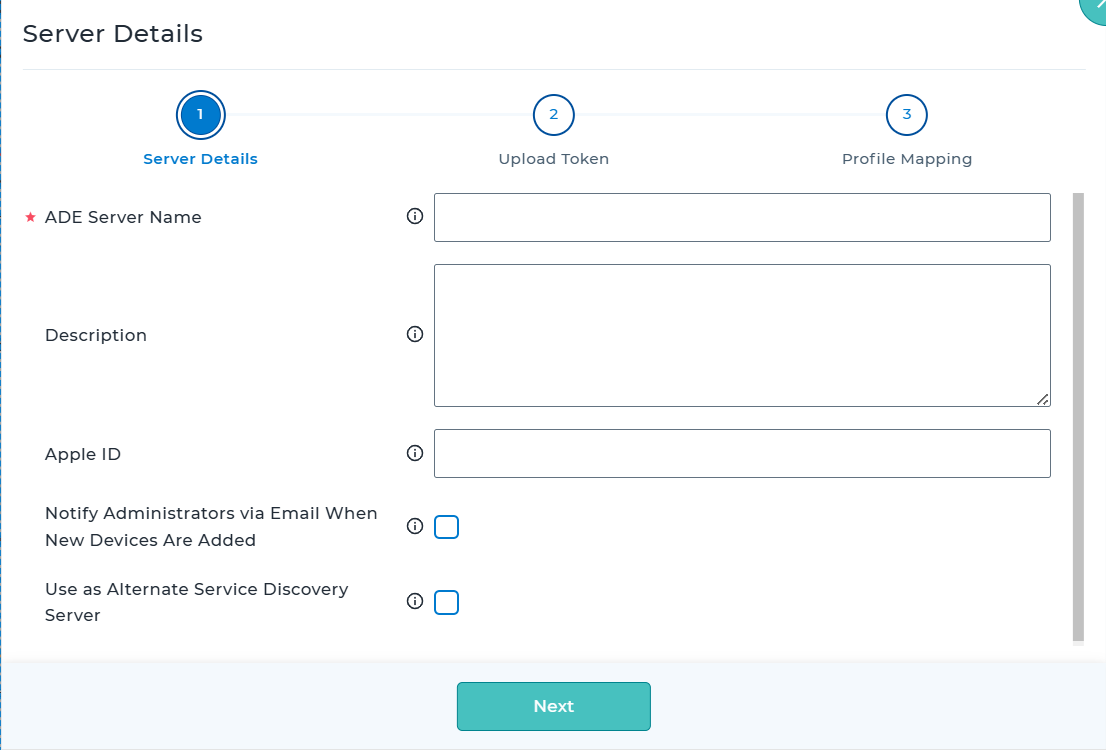
6. In the Server Details popup, configure the below information and click Next.
| Setting | Description |
|---|---|
| ADE Server Name | Provide the name of the ADE Server. |
| Description | Specify the description for the server that is about to be created. |
| Apple ID | Provide the Apple ID associated with the ABM account used for this integration. |
| Use as Alternate Service Discovery Server | If enabled, this ADE server will be used as a fallback for service discovery during account-driven enrollments. |
| Enrollment Type | Select Enrollment Type. Note: Ensure this ADE server is set as the default MDM server for the appropriate device type in ABM or ASM portal. If not configured, alternate service discovery will not work as expected. Service discovery will first attempt to use the well-known resource for the organization’s domain. If this fails, the device will fall back to ABM or ASM for an alternative location of the well-known resource file. |
| Notify Administrators via Email When New Devices Are Added | If enabled, the system will send email to Administrators with a list of new devices added on every manual sync as well as auto sync. |
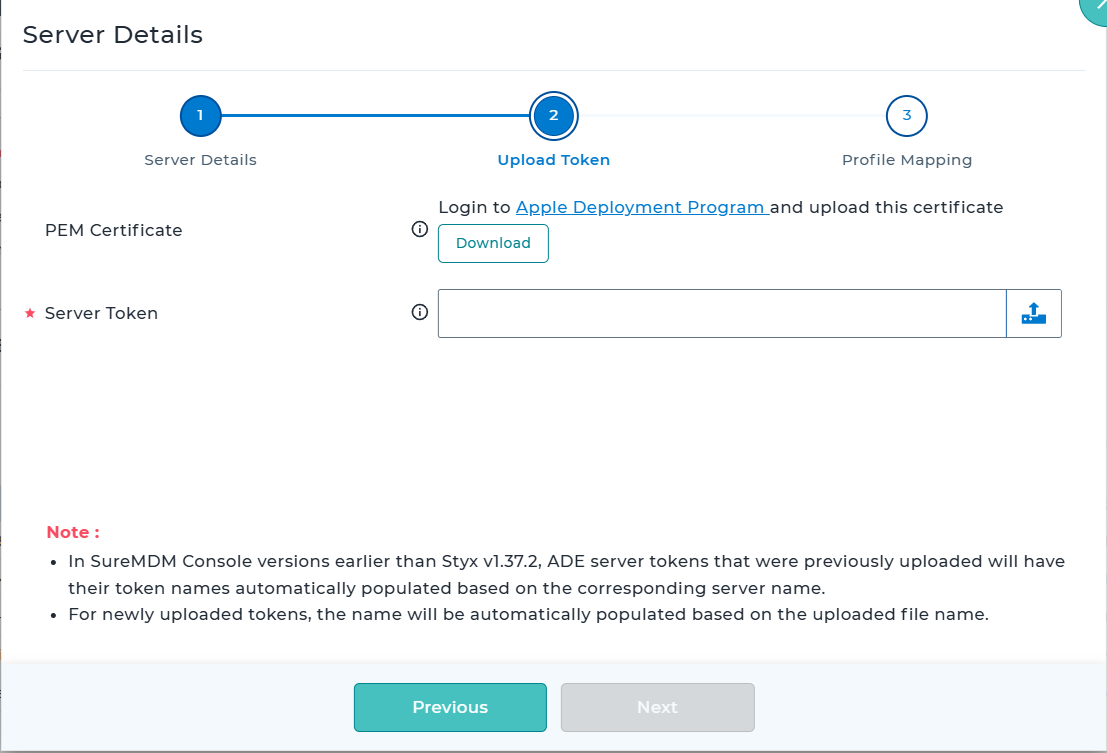
7. In the Upload Token step, download the PEM Certificate by clicking on the Download button.
PEM Certificate should be downloaded and uploaded in Apple Business Manager application during the process of MDM Server creation.