Upgrade and Migration for Multi-server Architecture
- Preparing Master and Agent Nodes:
- Ensure both Master and Agent nodes are set up and ready.
- Download the build file (k8sopinstaller) and extract it on both nodes.
Downloading and Importing Offline Images:
- Download offline images from the SureMDM package to your local machine.
- Import these images into all SureMDM Server where SureMDM will be deployed.
If you've previously deployed /suremdm with MR-OP-108 Styx v.1.11.8/styx v1.11.9/Styx v1.11.10/Styx v1.11.11, adhere to the steps below to configure /suremdm for compatibility with Styx v1.20.1 before initiating the upgrade process:
a. Navigate to the k8sopinstaller Directory.
b. Open Super_install.sh to edit:
- Locate (dns_name), enclose it within curly brackets{}, add "/suremdm," and Save the file.
For example: ip=$(echo https://${dns_name}/suremdm)
c. After a successful upgrade and migration, execute the following command in the Manifests > ingress-nginx directory to run the ingress-suremdm.yaml file:
sudo kubectl apply -f ingress-suremdm.yaml
d. Navigate to the k8sopinstaller>manifests>deployment and execute the following command to run the Deployment.suremdmhtmlhydra.yaml:
sudo kubectl apply -f Deployment.suremdmhtmlhydra.yaml
Navigate to the k8sopinstaller folder and run the following command in the terminal to start the upgrade process:
sudo bash Super_install.shAfter running the above command, the user will see the following output:
Thank you for selecting SureMDM OnPremise for your deployment.
Could you kindly specify the number of devices you plan to manage within your setup: <Enter the number>

You are configuring for <number> devices. Do you wish to continue? Yes[y] or No[n]:
Thank you for your input.
The user should provide the number of devices planned to manage within the setup Press ‘y’ to continue with the same device count, or press ‘n ‘ to change the device count.
- SQL server Configuration for SureMDM: SQL DB will automatically retrieve its details; wait until the following message appears:
SQL Test Connection Successful!
SQL Version: Microsoft SQL Server <version> (RTM) - 15.0.2000.5 (X64)
SQL Server IP: 192..x.x.x
Would you like to proceed with the SQL Server credentials and Connection String mentioned above?


Press 1 to Proceed.
Press 2 to Change.
Press 1 to continue with the same SQL DB connection string, or press 2 to change the connection string.
- MongoDB Server Configuration:
MongoDB will automatically retrieve its details; wait until the following message appears:
You are successfully connected to MongoDB Server. Connection String: mongodb://192.168.x.xx:27017."
Would you like to proceed with the mentioned MongoDB Server Connection String?
Press 1 to proceed. Press 2 to change.
Press 1 to continue with the same MongoDB connection string, or press 2 to change the connection string.
- Proceed with the Storage Configuration setup:
The storage data will be automatically fetched; wait until the message below is displayed.
Your <storage type> bucket is <bucket name>. Would you like to proceed with the same <storage type> bucket?
Press 1 to Proceed. Press 2 to Change.
Press 1 to continue with the same storage credentials, or press 2 to change the storage.
Messaging system configuration will be done.
Input the mapped DNS without the HTTPS protocol:
Enter your SureMDM Account URL:
The system admins must provide the DNS without the subpath extension (/suremdm), but they can specify the port on which the SureMDM server will be running.
- SSL Certificate Configuration:
Ensure that the SSL Certificate and Private Key are available in the 'appdata/certs' folder.
Enter the file name of the SSL Certificate (Example: file_name.extension):
Enter the file name of the Private Key associated with the Certificate (Example: file_name.extension):
- Choose the FCM configuration based on your requirements. If you have already deployed a previous build with FCM values, wait until it automatically fetches the details.
Your FCM Project ID is nxxxxxxxxx.
Do you wish to change FCM Configuration? Yes[y] or No[n]:
If the system admin wishes to change the existing FCM configuration, they can enter "y"; otherwise, they can enter "n".
- Choose the Google API key configuration. If you used a Google API key in a previous deployment, wait until it automatically fetches the details.
Google Maps Configuration:
Your Google API Key is AxxxxxxxxxxxxxxxxxxxxxxxxxxQ.
Do you want to change the Google Maps Configuration? Press 'y' for yes or 'n' for no.
If the system admin wishes to continue with the existing Google API key configuration, they can enter "y"; otherwise, they can enter "n".
- iOS and macOS Configuration:
Choose the iOS and macOS configurations based on your requirements.
Do you want to proceed with iOS and macOS Configuration? Press 'y' for yes or 'n' for no.
If the system admin wishes to continue with the iOS and macOS configuration, they can enter "y" by providing the DefaultPush certificate password; otherwise, they can enter "n".
Enter Default Push Certificate Password
- Configure Android Enterprise based on your requirements.
Android Enterprise Configuration:
Do you want to proceed with the Android Enterprise configuration? Press 'y' for yes or 'n' for no.
If the system admin wishes to continue with the Android Enterprise configuration, they can enter "y" and provide the following details, otherwise, they can enter "n":
Enter the name of the MSA Account Certificate in the appdata/api/appdata directory (Example: [file_name.p12]):
Enter the name of the ESA Account Certificate in the appdata/api/appdata directory (Example: [file_name.p12]):
Enter MSA Account Email:
Enter ESA Account Email:
ESA configuration is optional, system admins can press Enter to skip as per the requirement.
- Choose the Mail configuration based on your requirements. Mail server configuration:
Do you want to proceed with Mail server configuration? Press 'y' for yes or 'n' for no.
If system admin wishes to continue with the Mail configuration, they can enter "y" and provide the following details, otherwise, they can enter "n":
Enter Mail server:
Enter Mail user:
Enter Mail password:
Enter Mail Server Backup:
The Mail Server Backup field is optional.
- Choose the Windows Push Notification Configuration based on your requirements.
Windows Push Notification Configuration:
Do you want to proceed with the Windows Push Notification Configuration? Press 'y' for yes or 'n' for no.
If the system admin wishes to continue with the Windows Push Notification configuration, they can enter "y" and provide the following details, otherwise, they can enter "n".
Enter Package Family Name:
Enter SID:
Enter Client Secret:
- Choose the MQTT Gateway (Things enrollment) configuration based on your requirements. MQTT gateway (IoT/Things enrollment) configuration:
Do you want to proceed with MQTT gateway configuration? Press 'y' for yes or 'n' for no.
If the system admin wishes to continue with the MQTT Gateway (Things enrollment) configuration, they can enter "y", otherwise, they can enter "n."
Port 1883 should be allowed to configure Things QR enrollment. Click here to learn how to configure Things QR enrollment (CamLock and CamLock Sentry).
- Select the SureMDM Hub configuration based on the requirements.
SureMDM Hub configuration:
Do you wish to continue with SureMDM Hub configuration? Press 'y' for yes or 'n' for no.
If the system admin wants to continue with the SureMDM Hub configuration, they can enter "y" by providing the following details; otherwise, the system admin can enter "n".
Enter SureMDM Hub Email-ID:
Enter SureMDM Hub Company Name:
The username "Administrator" will be the default admin user for SureMDM Hub.
- After a successful deployment, the system admins will receive the following message:
SureMDM Setup Successful! Please wait for some time and then access SureMDM Web Console.
- Post-upgrade, get the list of Styx v.1.11.8/styx v1.11.9/Styx v 1.11.10/Styx v1.11.11 images by running the following command:
sudo k3s ctr images ls
- System admins need to delete Styx v.1.11.8/styx v1.11.9/Styx v 1.11.10/Styx v1.11.11 images using the command:
sudo k3s ctr images rm <image name>
For Example: sudo k3s ctr images rm docker.io/onpremise/afwpubsubservice:MR-108-1.11.10
The system admins can check the status of the pods by running the command: kubectl get pods -n suremdm
Download and extract the Migration Tool on the Windows machine where SQL and mongo DB is hosted.
Navigate to Migrator_tool116 >> \SureMDM_Migrator (found within the extracted Migrator Tool folder) and execute SureMDM_Migrator.exe. The system admins will see the following options:
Configure application settings
Migrate my data
Exit
Choose option 1, then enter the SQL DB and MongoDB details.
The system admin can press Enter to use the default values for the MongoDB connection string and MongoDB Database name.
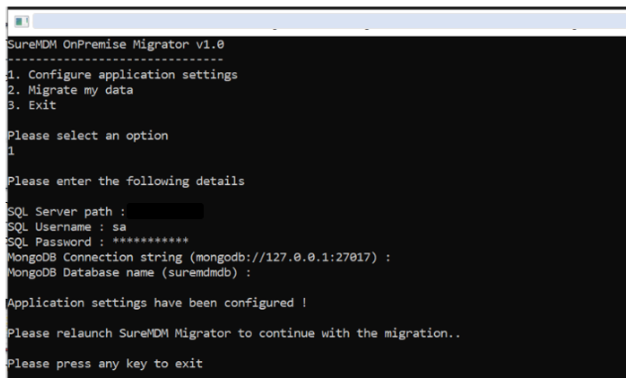
Once the App Settings are configured, Exit the tool and Relaunch it.
Select option 2 to start the migration.
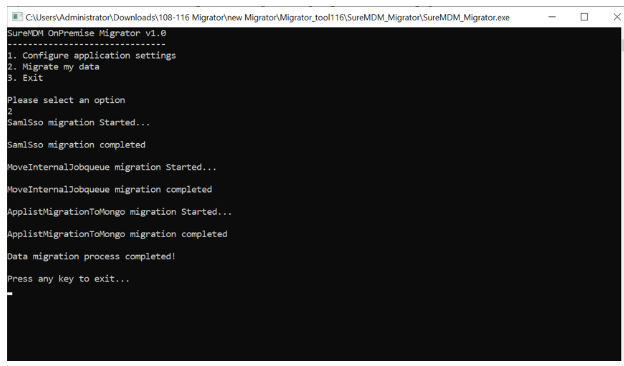
- Once the migration is complete, Exit the tool.
If you've previously deployed /suremdm with styx v.1.11.8/styx v1.11.9/styx v 1.11.10, adhere to the steps below to configure /suremdm for compatibility with Styx v1.20.1:
Navigate to Manifests > ingress-nginx and execute the following command to run the ingress-suremdm.yaml file to complete setup for /suremdm support.
sudo kubectl apply -f ingress-suremdm.yaml
Navigate to the k8sopinstaller>manifests>deployment directory and execute the following command to run the Deployment.suremdmhtmlhydra.yaml to complete the setup for /suremdm support:
sudo kubectl apply -f Deployment.suremdmhtmlhydra.yaml
SureMDM upgrade and migration is completed.
Once the migration is completed, the user should reset the admin console password by clicking on the forget password option.
If you want to configure SCEP, DEP, Things, Zebra Printer, and Windows CE, click here