SureAccess Configuration Guide for macOS and Windows
1. Overview
Use this guide to configure SureAccess in SureMDM for macOS and Windows devices. You can configure the VPN connection, control website access, block specific URLs, and manage data uploads through Domain-Based and Application-Based DLP policies.
2. Configuration Flow
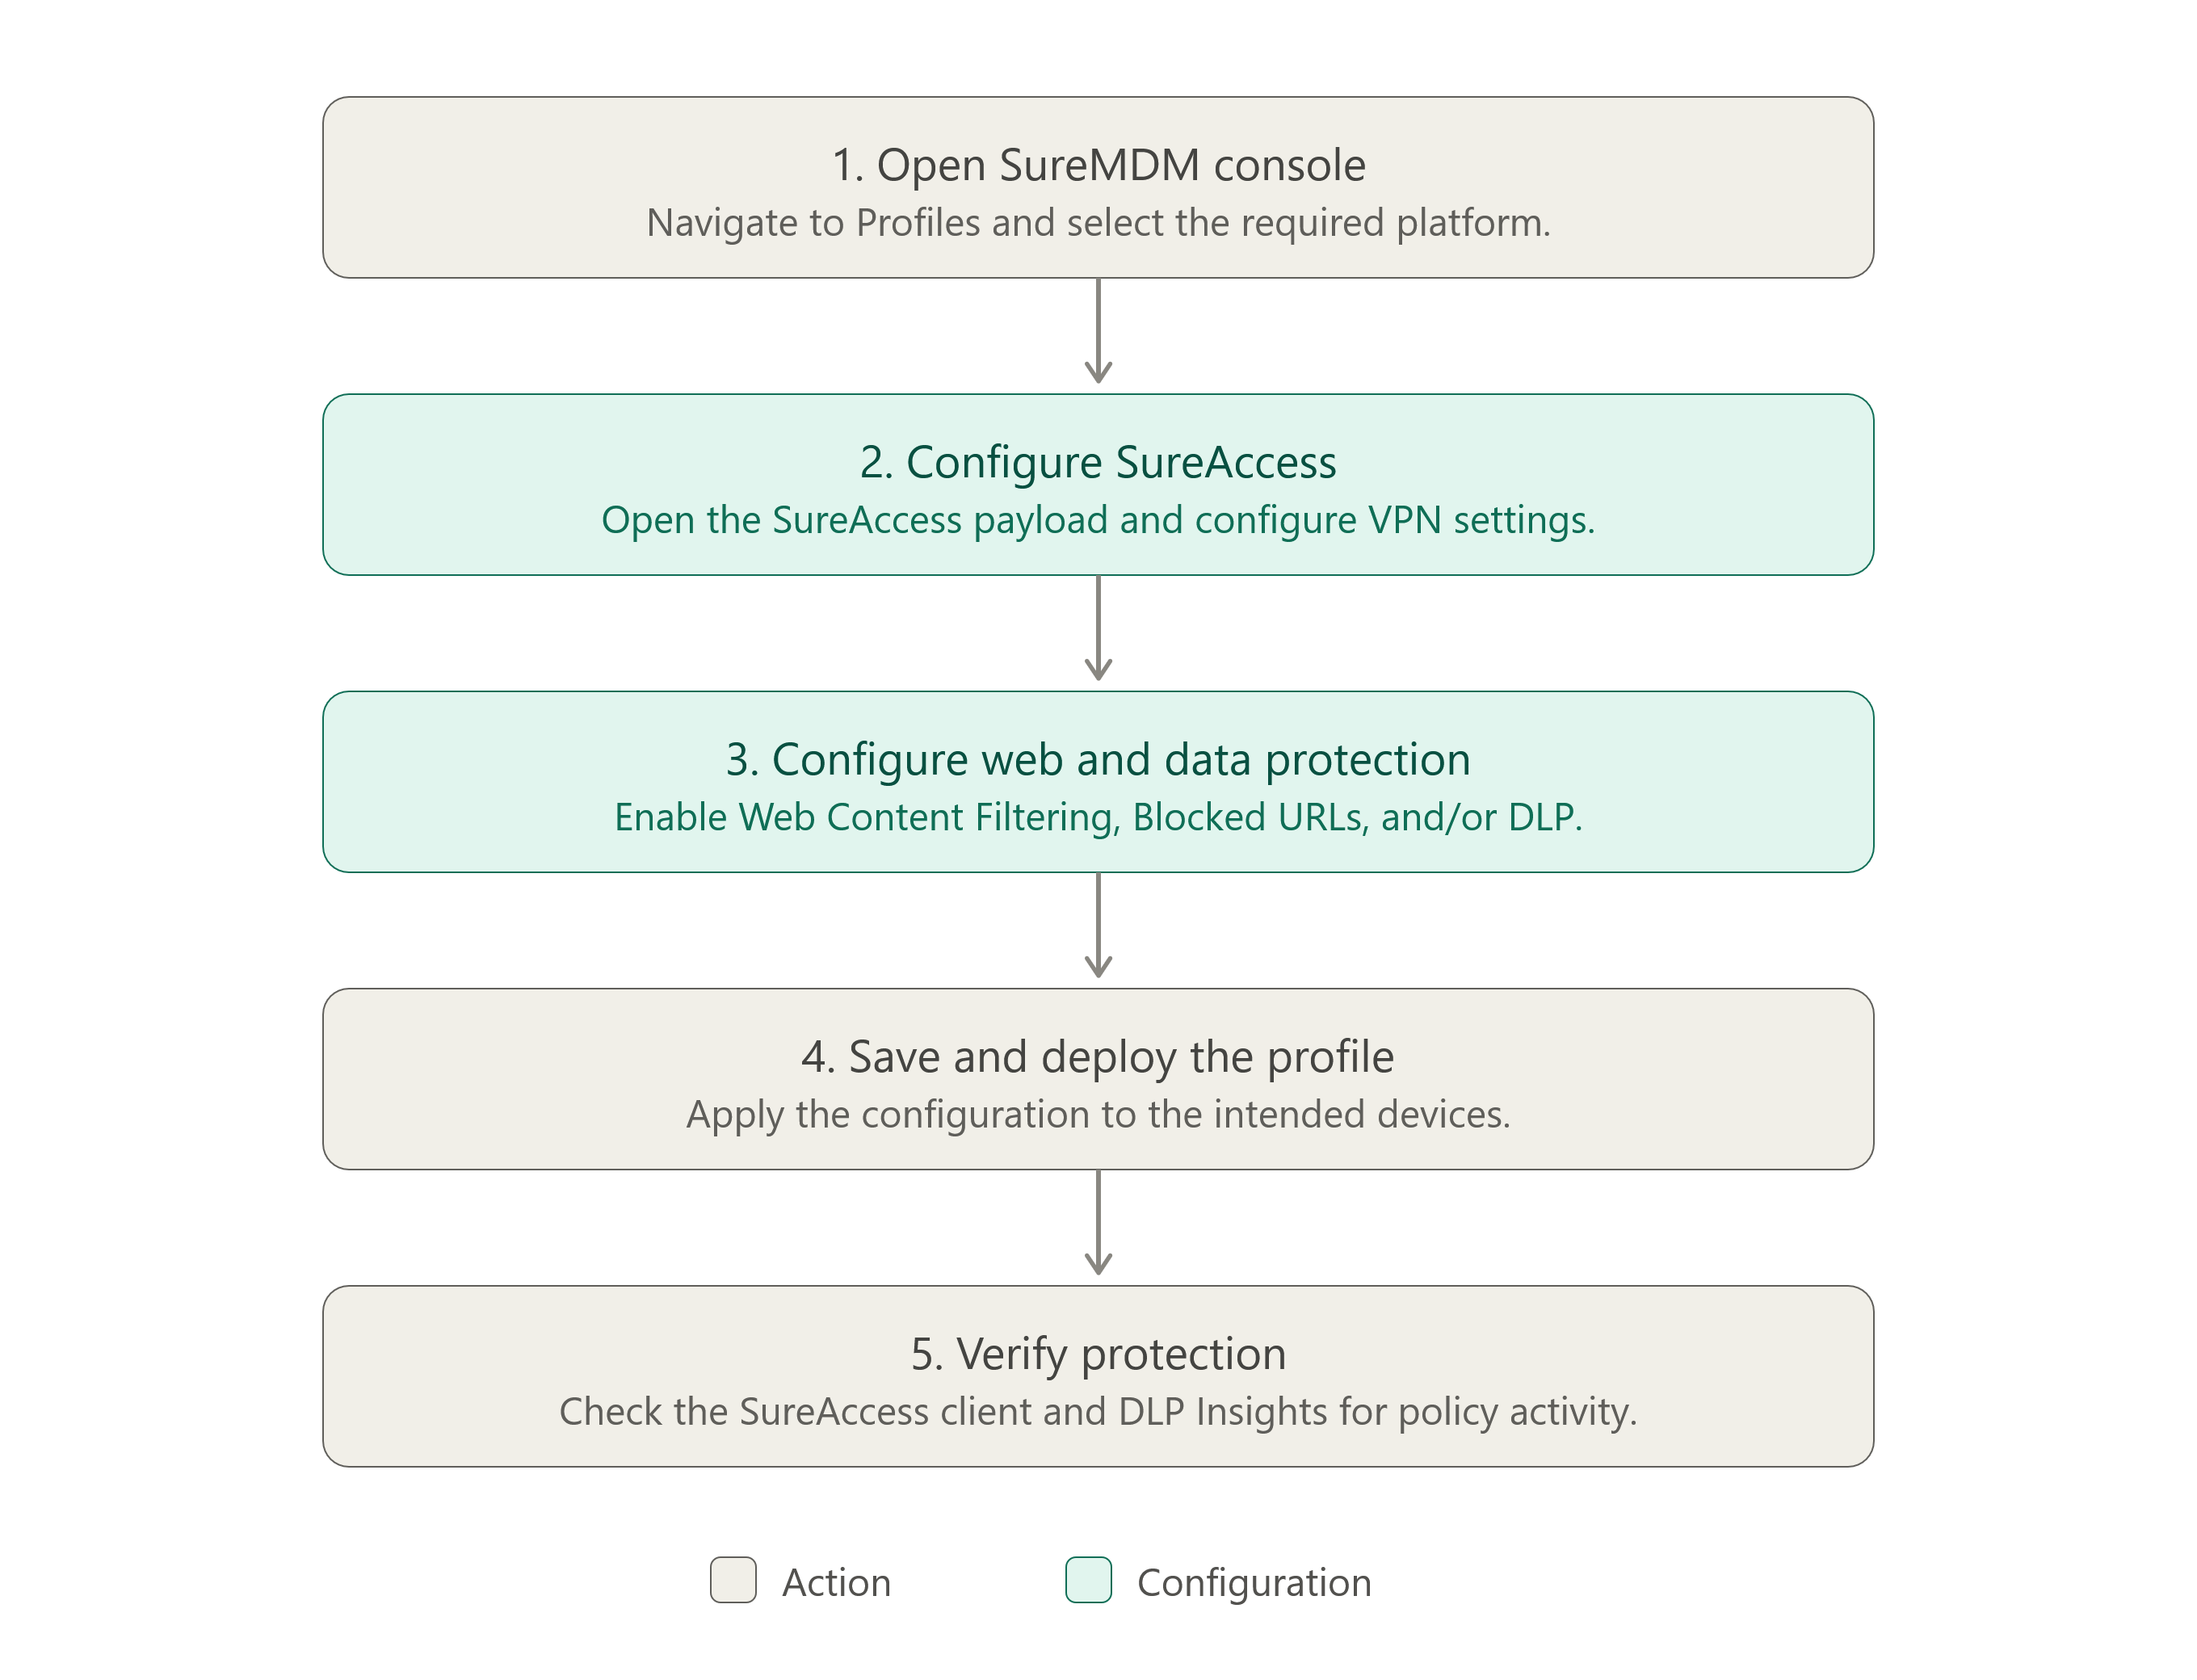
3. Configure the SureAccess Payload
Step 1: Open the Profile Configuration
- Sign in to the SureMDM console.
- Navigate to Profiles.
- Select the platform for which you want to configure SureAccess: macOS or Windows.
- Select the Enrollment Type if macOS is selected
- Locate the SureAccess payload and click Configure.
Important for Windows: A profile containing a VPN Configuration payload cannot also be configured with the SureAccess payload. Remove the conflicting payload before proceeding, if required.
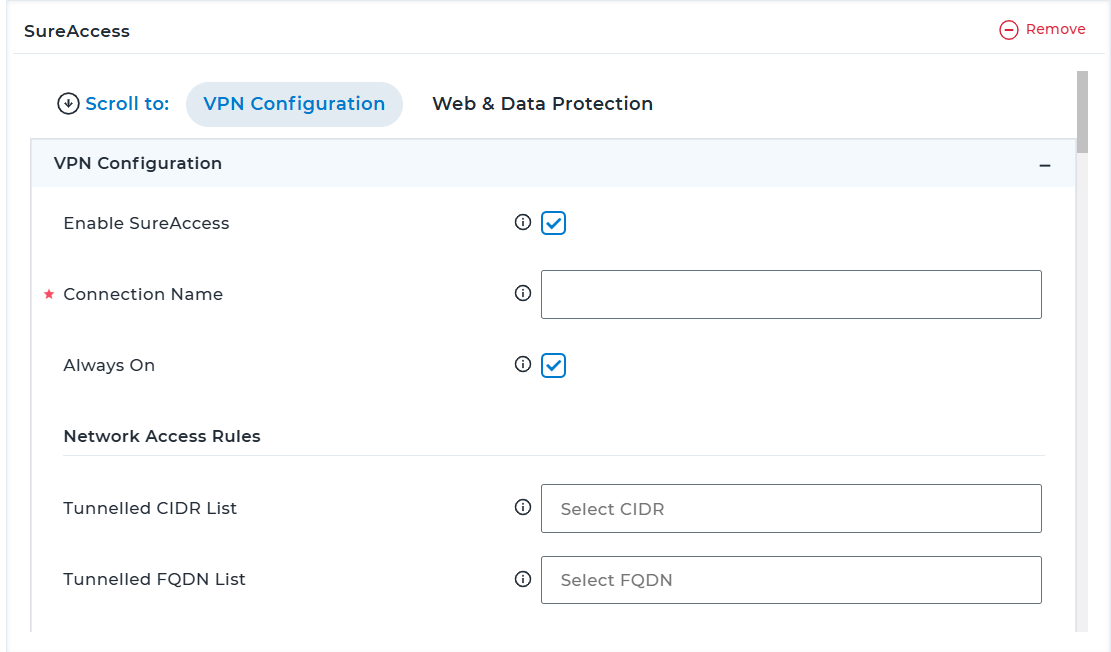
Step 2: Configure VPN Settings
In the SureAccess payload, open the VPN section and configure the available settings according to your organization's requirements.
| Setting | Administrator Action |
|---|---|
| Enable SureAccess | When enabled, deploys the SureAccess agent and applies secure remote access settings. When disabled, removes the configuration. |
| Connection Name | Enter the name to identify the connection. |
| Always On | Keeps the SureAccess connection active at all times. |
| Tunnelled CIDR List | Select the IP ranges (CIDR blocks) that should be accessed through SureAccess. DNS Resolutions are skipped for this IP range and are accessible over IP addresses only. |
| Tunnelled FQDN List | Select the FQDNs that will be routed through the SureAccess tunnel. |
| Enable Authentication | Enables user authentication during SureAccess setup. |
Review the connection settings before moving to Web & Data Protection.
4. Configure Web & Data Protection
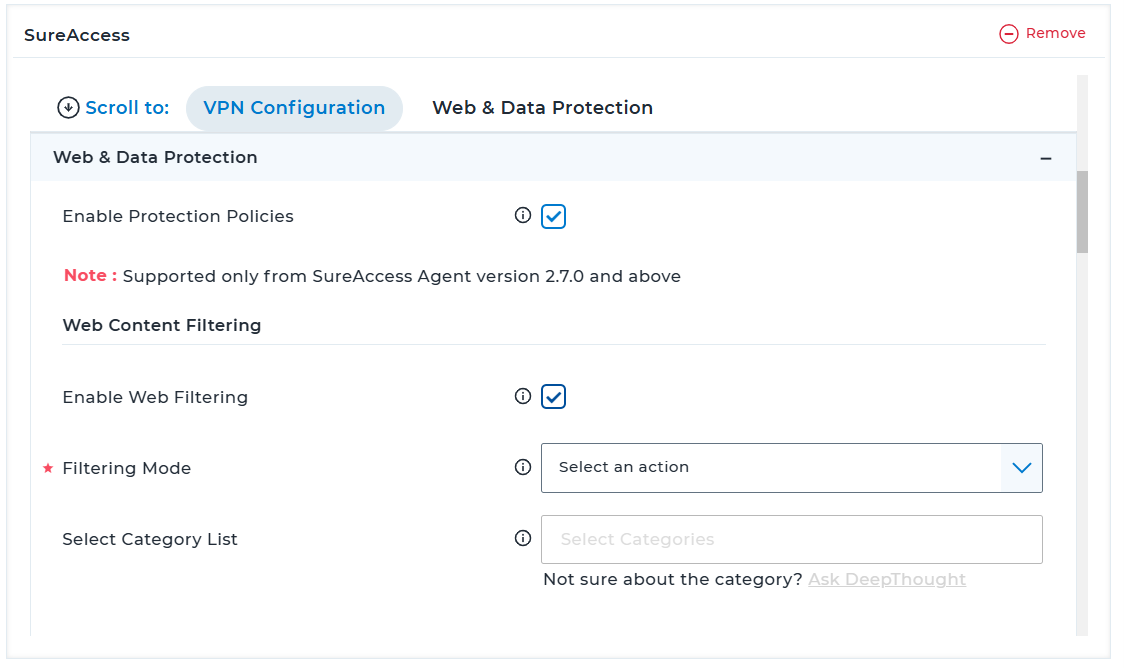
- Expand Web & Data Protection in the SureAccess payload.
- Enable Enable Protection Policies.
- Configure the required protection modules:
- Web Content Filtering
- Blocked URLs
- DLP Configuration
5. Configure Web Content Filtering
Use Web Content Filtering to control website access based on website categories.
Steps
- Under Web & Data Protection, open Web Content Filtering.
- Enable Enable Protection Policies, if it is not already enabled.
- Select the required Filtering Mode:
- Allow Websites — allow websites in the selected categories and restrict others.
- Block Websites — block websites in the selected categories.
- Select the required categories, such as:
- Online Ads
- Pornography / Sexually Explicit / Adult Content
- Social Networking
- Popup Ads
- Unknown
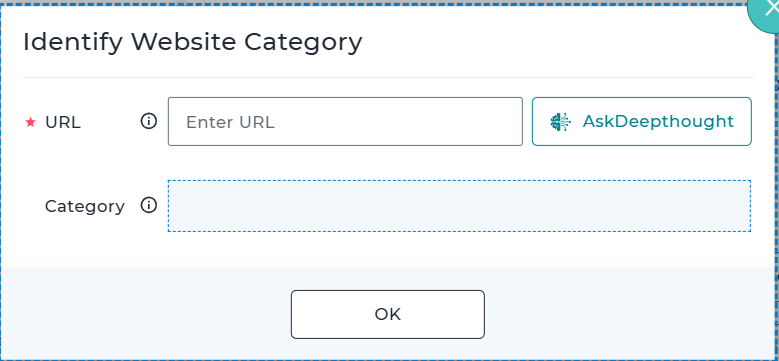
- If you need to identify a website's category, use the AskDeepthought lookup option, where available.
- Review the selected mode and categories.
Note: Select the filtering mode carefully. The selected mode determines how the category selection is applied.
6. Configure Blocked URLs
Use this section to block specific websites or domains regardless of the category-filtering configuration.
Steps
- Expand Blocked URLs.
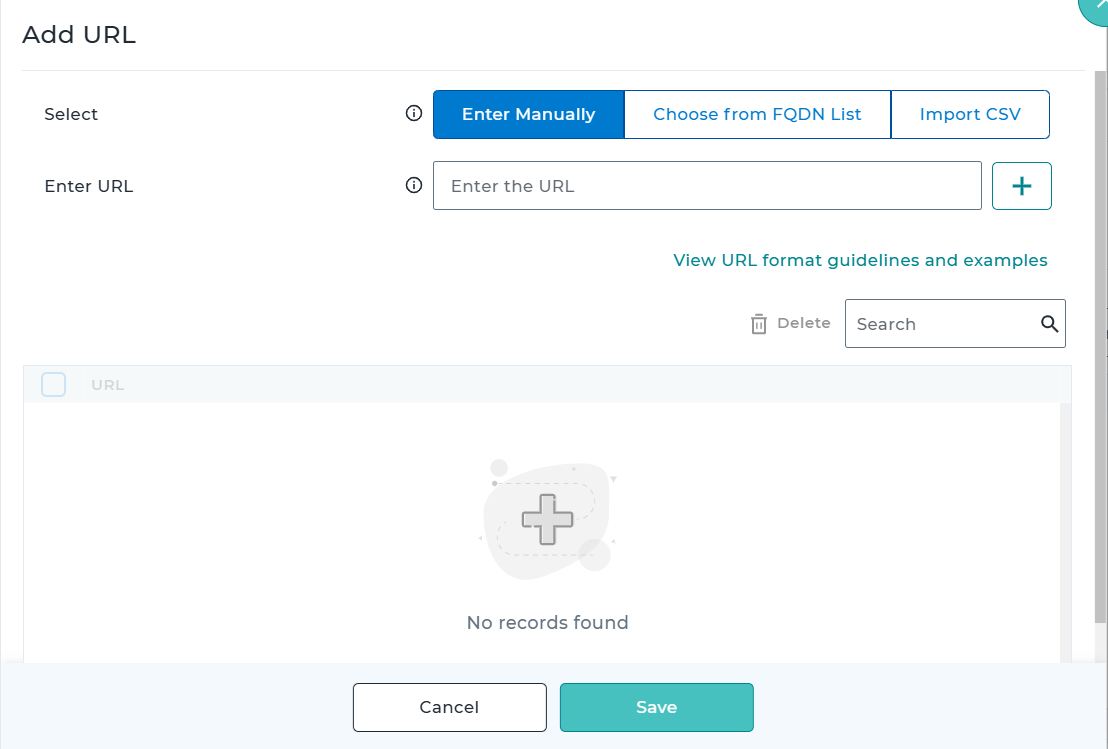
- Click Add.
- Select the required input method:
- Enter Manually — enter the URLs or domains to block.
- Choose from FQDN List — select entries from the available FQDN resources.
- Import CSV — import a supported file containing the URLs.
- Enter or select the required entries, or upload the file.
- Review the entries and resolve any invalid or duplicate values as indicated by the console.
- Save the entries.
To maintain the list later, use the available Edit, Delete, and Search options. Multiple entries can be selected for deletion.
To manage reusable FQDN resources, navigate to:
Settings → Account Settings → Enterprise Integration → SureAccess → SureAccess Configurations → FQDN Resources
Important: Blocked URLs take precedence over the other configured filtering rules.
7. Configure Domain-Based Upload Control
Use Domain-Based Upload Control to define which domains users can upload data to.
Steps
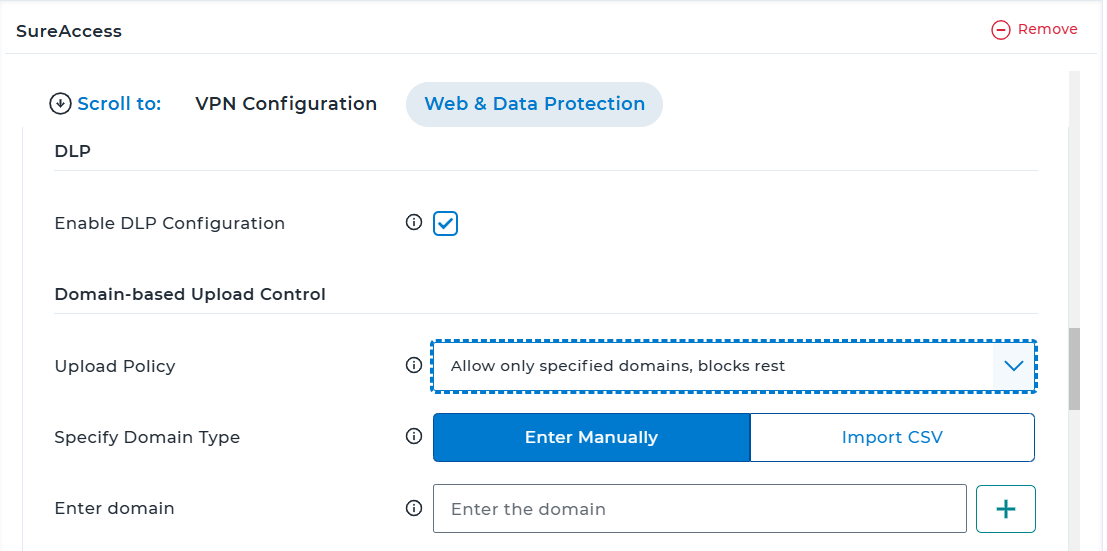
- Under DLP, enable Enable DLP Configuration. This option is unchecked by default.
- In Domain-Based Upload Control, select an Upload Policy:
- Allow only specified domains, blocks rest — allow uploads only to the domains you specify and block uploads to other domains.
- Block only specified domains, allows rest — block uploads to the specified domains and allow uploads to other domains.
- Under Specify Domain Type, select how to provide the domain list.
Option A: Enter Domains Manually
- Select Enter Manually.
- Enter a valid domain in the Enter Domain field.
- Click the + icon to add the domain to the table.
- Repeat for each domain you want to configure.
Option B: Import Domains from a File
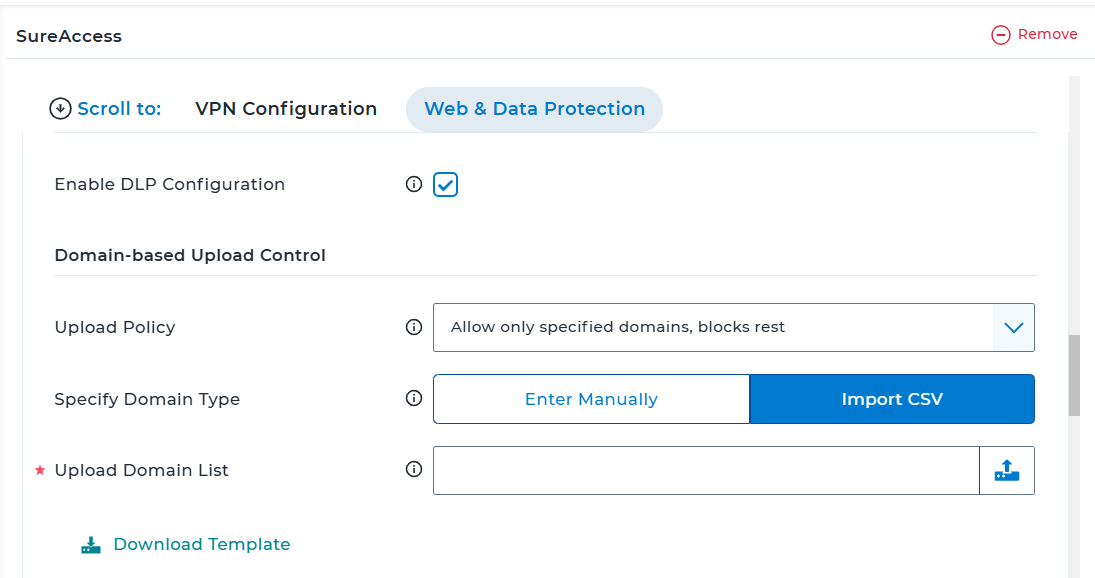
- Select Import CSV.
- Click Download Template to download the
add_domains.csvtemplate. - Populate the template with the required domains.
- Upload the completed file in Upload Domain List.
- Review the import confirmation and the domains displayed in the table.
File requirements: CSV, XLSX, and XLS formats are supported.
To remove domains, select the relevant table entries and click Delete. Review the selected entries before confirming the deletion.
8. Configure Application-Based DLP
Use Application-Based DLP to configure upload restrictions for supported applications and enterprise services.
Steps
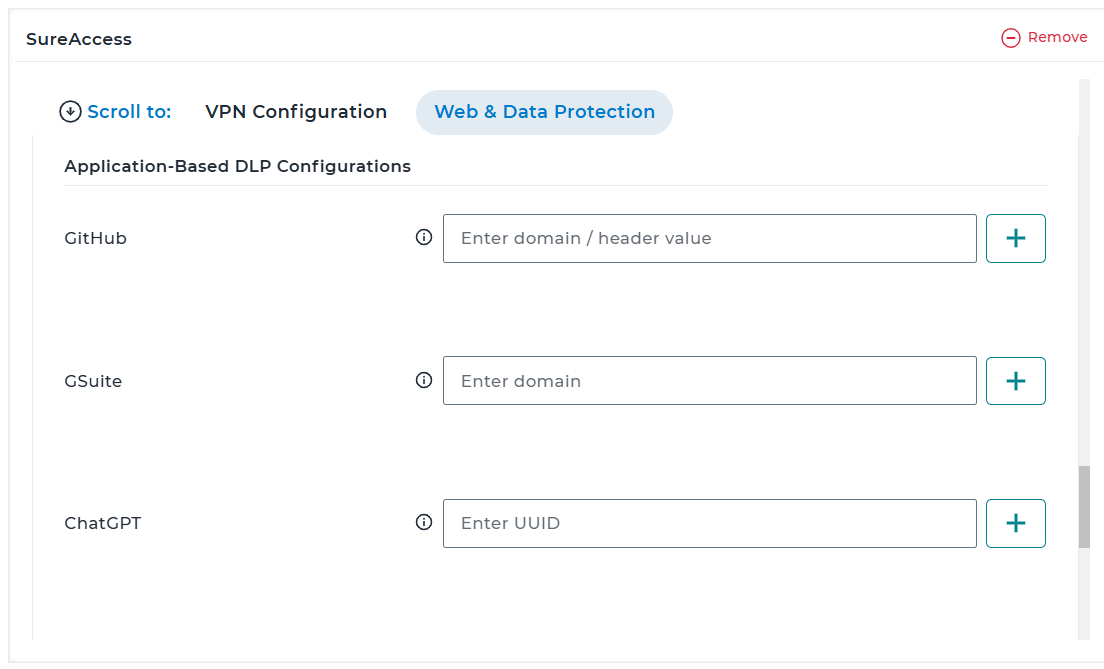
- In the DLP section, locate Application-Based DLP Configurations.
- Configuring pre-defined enterpise application:
| Applications | Required Parameter |
|---|---|
| GitHub | Enter the domains or Enterprise Header values that are permitted for this service. Access using any other domains will be restricted. |
| GSuite | Enter the domains that are permitted for this service. Access using any other domains will be restricted. |
| ChatGPT | Enter the UUID values that are permitted for this service. Access using UUIDs not included in this list will be restricted. |
| Claude | Enter the UUID values that are permitted for this service. Access using UUIDs not included in this list will be restricted. |
- For applications that support multiple entries, use the + icon to add the required values.
- Configuring Custom Enterprise Application To configure custom enterprisse application, below information should be provided.
| Field | Description |
|---|---|
| Name | Enter the name for the custom schema. |
| Enterprise Header | Enter the Enterprise Header name. |
| URL | Enter the URL |
| Domain / Enterprise Header Value | Enter the related domains or header values of the specified Enterprise Header. |
Click Add to add the custom enterprise application to the table.
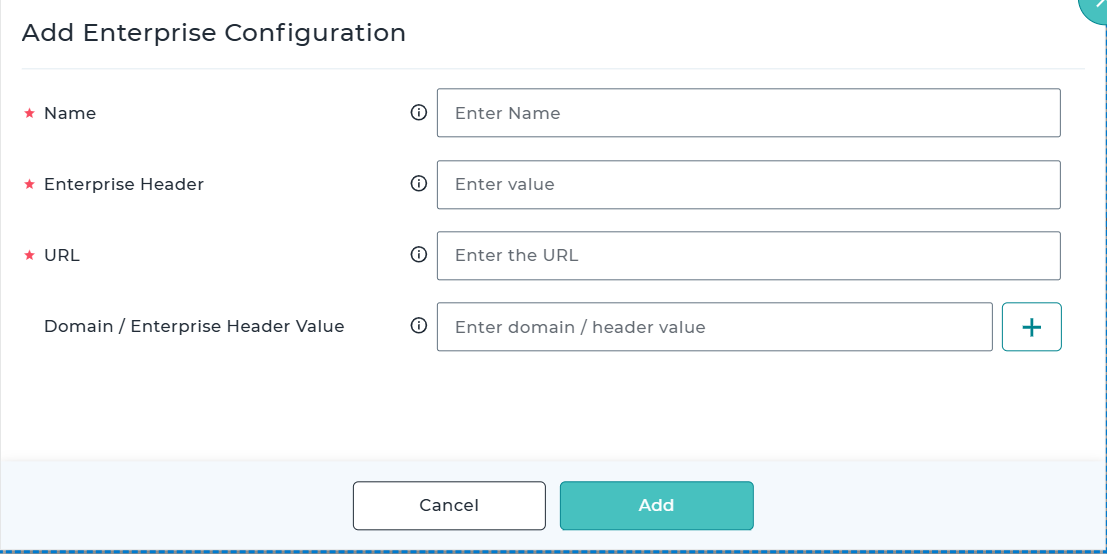
- Review the configured entries and their associated domain or application mappings.
- Repeat for each application that requires specific upload controls.
Use the domain or Enterprise Header values that match your organization's environment. Do not add values unless they are intended to be permitted by your policy.
9. Save and Deploy the Profile
After configuring the required settings:
- Review the VPN, Web Content Filtering, Blocked URLs, and DLP configurations.
- Save the profile.
- Deploy the profile to the intended macOS or Windows devices using your standard SureMDM deployment workflow.
- Confirm that the profile is successfully applied to the target devices.
- Verify that the SureAccess connection is established and the expected protection settings are active.
Windows-specific restriction: A Windows profile cannot be configured with both the SureAccess payload and the VPN Configuration payload. Existing profiles are intended to continue functioning without changes, but new configuration attempts must follow this restriction.
10. Verify Configuration and Monitor DLP Activity
A. Device Behaviour
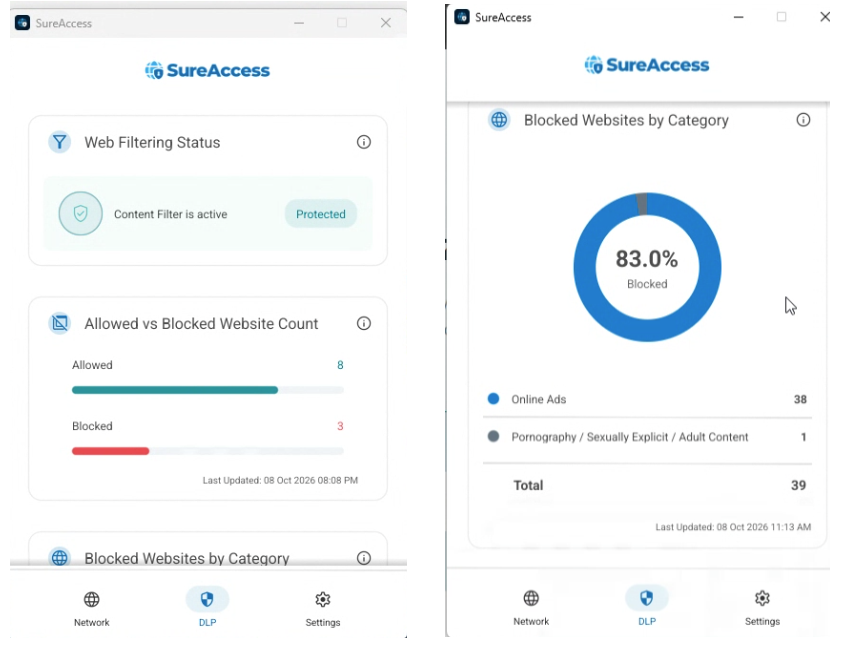
- Open the SureAccess agent on the target device.
- Sign in and wait until the connection initialization completes.
- Confirm that the agent displays the Network, DLP, and Settings tabs. DLP configurations can also work without active SureAccess VPN connection.
- Open the DLP tab to review the available protection status and activity metrics.
B. View DLP Insights in SureMDM
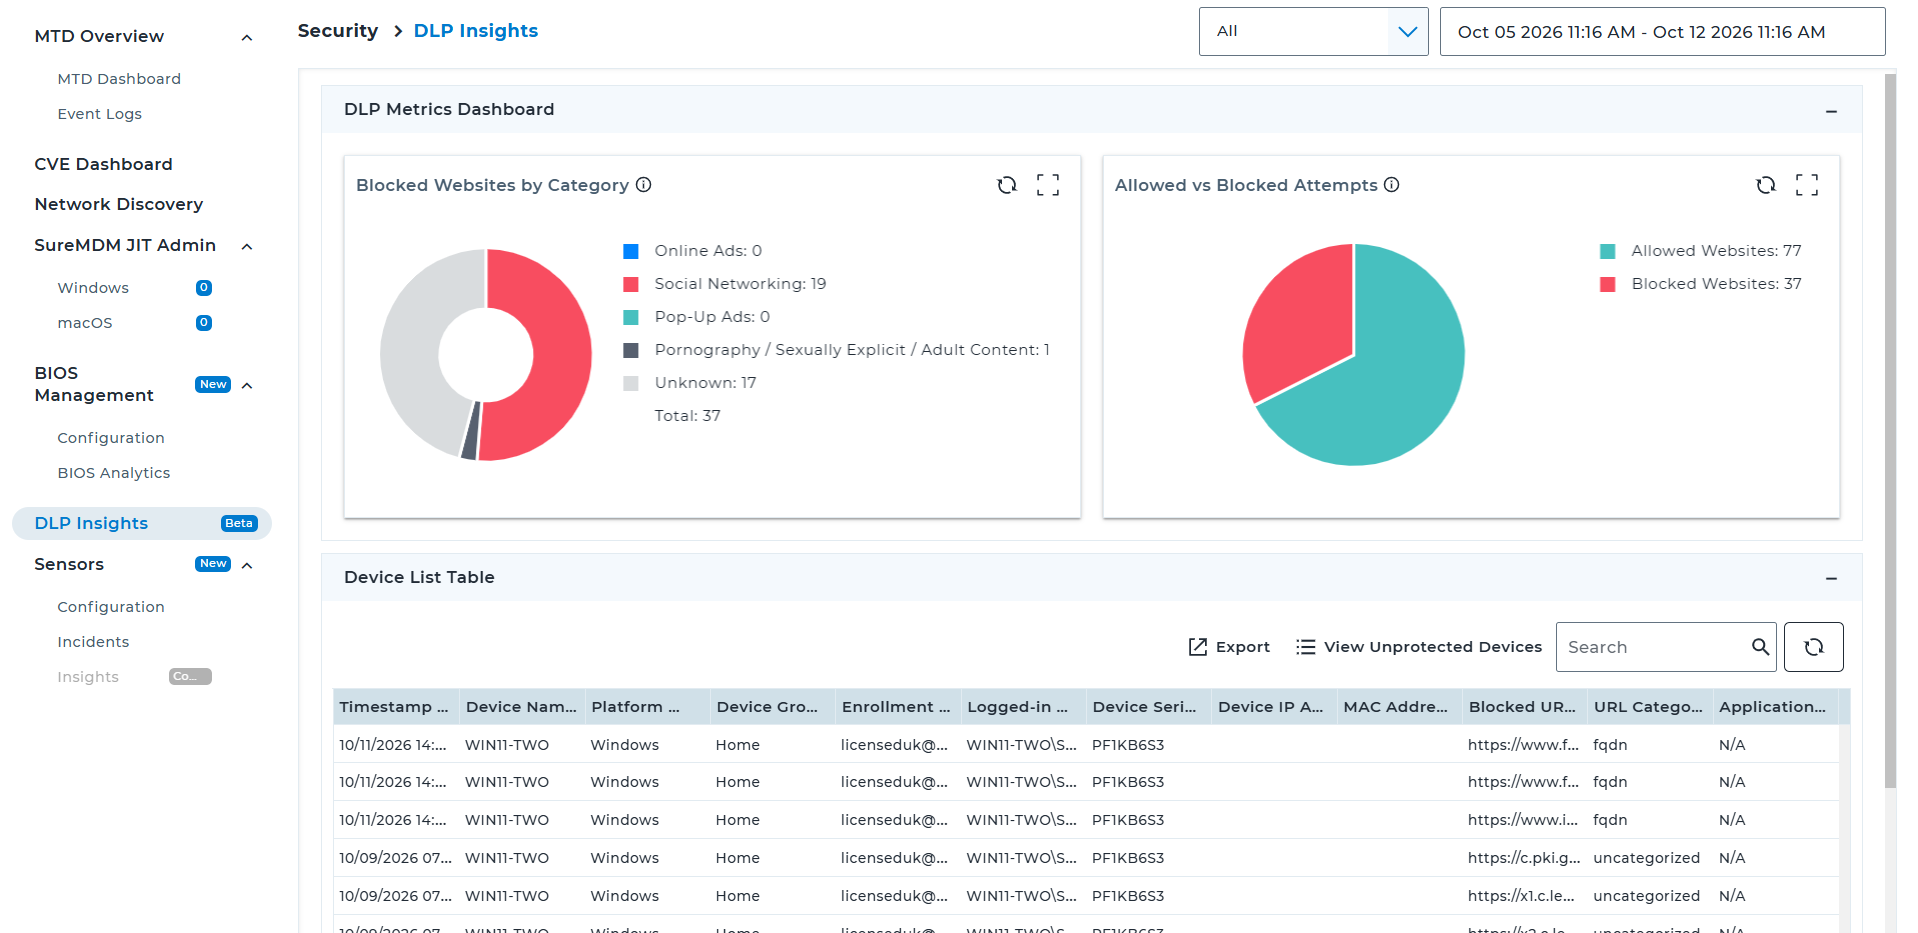
- Navigate to Security → DLP Insights.
- Select All, macOS, or Windows from the platform filter. All is selected by default.
- Expand DLP Metrics Dashboard to review blocked websites by category.
- Expand the device-level monitoring section to review the available device insights.
- If you have configured policies but no metrics appear yet, check again after the managed devices send DLP telemetry.
- If DLP Insights displays Awaiting DLP data from managed devices, the policies may be configured but the corresponding telemetry has not yet been received.
- If the account lacks a valid SureAccess license, DLP Insights requires an active subscription or add-on.
To access DLP Insights from the SureAccess settings page, navigate to:
Settings → Account Settings → Enterprise Integrations → SureAccess
Click DLP Insights.
11. Understand the Policy Evaluation Order
When multiple protection rules apply to the same activity, SureAccess evaluates them in the following order:
Blocked URLs
    ↓
Domain-Based Upload Control
    ↓
Application-Based DLP Configurations
    ↓
Category Filtering (Web Content Filtering)
An explicit URL blocking is evaluated first, followed by domain-based upload rules, application-specific DLP rules, and category filtering.
For example, if Gmail/GSuite matches an Application-Based DLP configuration, that configuration is evaluated before category filtering.
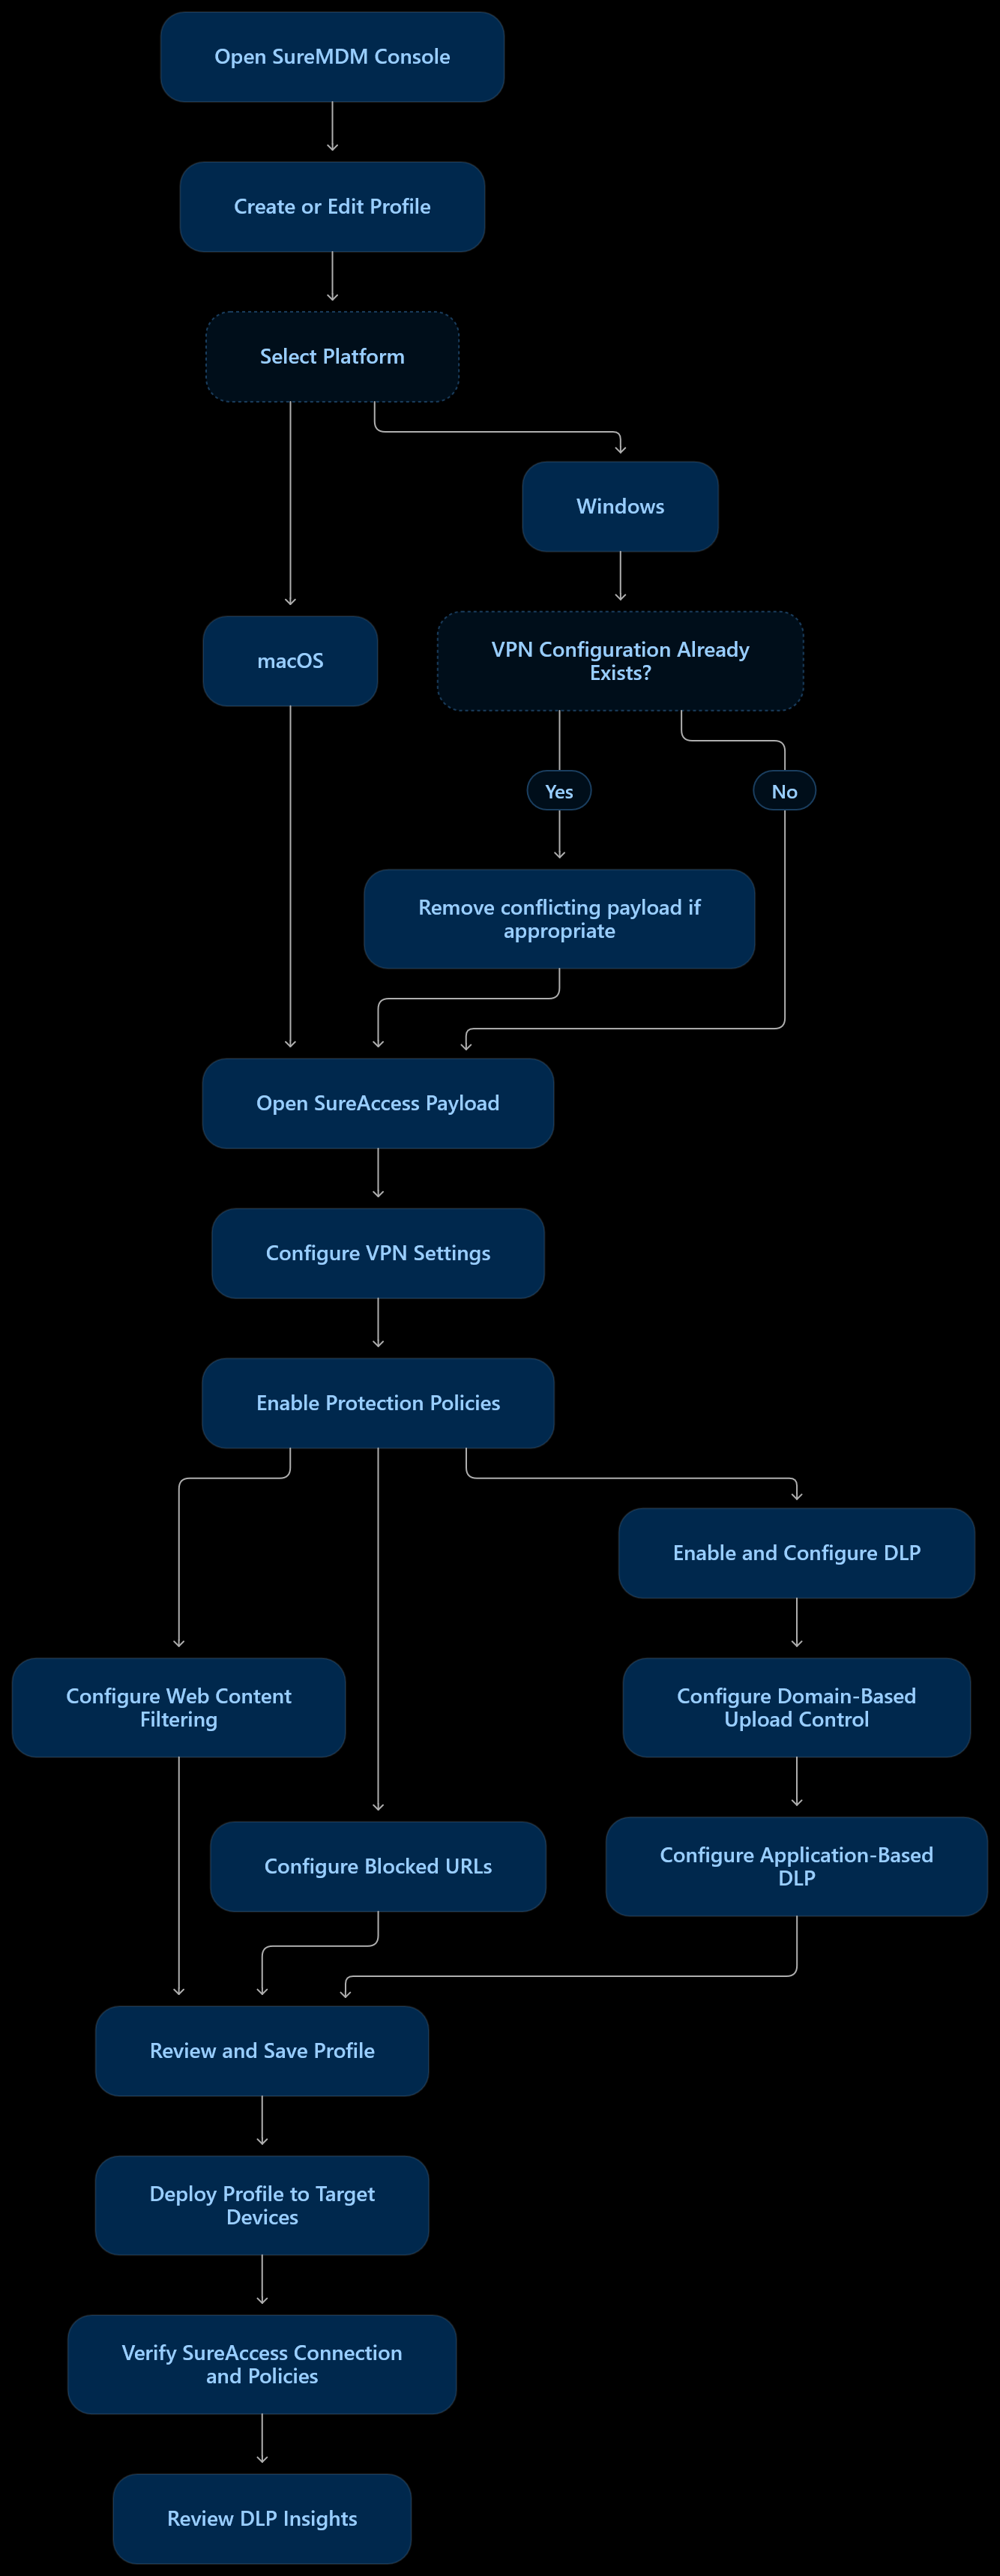
12. End-to-end administrator flow
DLP for macOS — Coming Soon
Data Loss Prevention (DLP) capabilities for macOS will be made available as soon as possible. Although the current documentation describes the DLP configuration workflow for macOS, these functionalities are not yet available in SureMDM for macOS.
Once released, the configuration options and workflow are expected to remain consistent with those currently available for Windows, providing a familiar experience for administrators.
Stay tuned for updates!