Environment Setup
Device Enrollment Settings
Device Enrollment Settings enables administrators to configure enrollment rules and restrictions for devices using the following options:
Device Enrollment Rules
Device Enrollment Restrictions
Device Enrollment Rules
SureMDM allows admins to set device enrollment rules for devices upon enrollment, such as naming the device and Device Authentication Types.
To enable auto naming of devices, and enable device authentication types on enrollment, follow these steps:
Navigate to the SureMDM Web Console > Settings (icon located at the top right of the screen) > Account Settings > Device Enrollment Settings > Device Enrollment Rules.
Configure the device enrollment rule settings and click Apply.
| Settings | Description |
|---|---|
| Device Naming | |
| Prefix | Text or numerals added at the beginning of the device name. |
| Suffix | Text/numerals/macros (IMEI, MAC Address, Serial Number) added at the end of the device name. For example - Macro for IMEI can be added as "$IMEI$". |
| Start Count | The number from which the count has to start. |
| Number of Digits | The number of digits including the Start Count |
| Next Device Name | Displays the device name that will be enrolled next. Based on the above selected criteria, the Next Device Name can be added/modified as per the requirement. Refer to the screenshot given as an example at the end of this table. |
| Reset | Use this option to reset the device naming counter for newly z devices. |
| Enrollment Authentication | |
| Device Authentication Type | Select the required Device Authentication Type from the following options: |
| SureMDM App Store Authentication | Use this section to configure SAML/OAuth settings for SureMDM App Store authentication. This section is available only when the Enrollment Authentication Type is set to SAML/OAuth Authentication. |
| Enable SAML/OAuth Config for SureMDM App Store Authentication | Enable this option to use the configured SAML/OAuth settings for SureMDM App Store authentication. On Windows devices, it applies to the App Store and Web Apps. |
| Enable Session Timeout | Automatically terminates the SureMDM App Store session after a specified time interval |
| Timeout Interval | Enter a timeout value in hours (between 1 and 24) after which the session will expire. |
| Enrollment Identifier | |
| Use Serial Number | Use this option as an enrollment identifier when Mac/IMEI details are not available for a device. Note: Use the Number as an Enrollment Identifier only when Mac/IMEI are not available. |
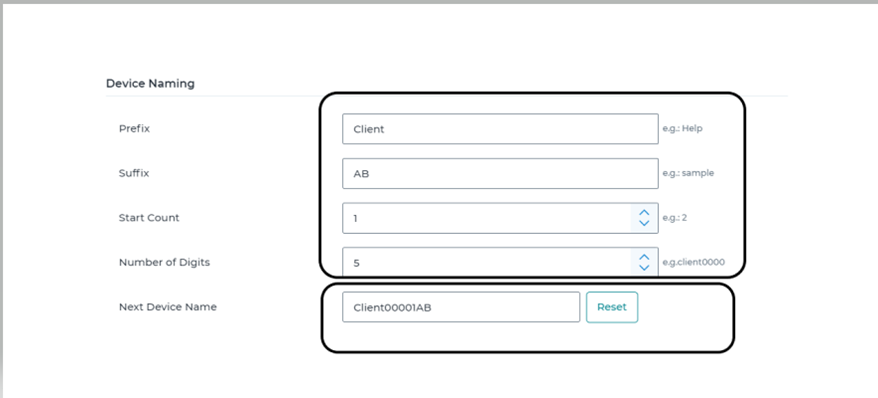
Based on the selected criteria, such as the Prefix, Suffix, Start Count, and Number of Digits, the Next Device Name can be added/modified as per the requirement.
Device Enrollment Restrictions
Device Enrollment Restrictions allow admins to set enrollment restrictions based on the platform, OS version, and more.
Administrators can set enrollment restrictions only for Android and Windows devices.
To set enrollment restrictions, follow these steps:
Navigate to SureMDM Console > Settings > Account Settings > Device Enrollment Settings.
Select Device Enrollment Restrictions under Device Enrollment Rules.
Configure the below settings and click Save.
| Settings | Description |
|---|---|
| Android | |
| Platform | Use this option to allow/block Android devices from enrolling in the SureMDM console. |
| OS Version | Select the minimum and maximum OS version that allowed for the enrollment. Note: This feature will be available only on the SureMDM Agent version running 27.10.06 and above. |
| Device Model | Enter the comma-separated list of device models that allowed for the enrollment. |
| Manufacturers | Enter the comma-separated list of manufacturers that allowed for the enrollment. |
| Device Posture Policy | |
| Potentially compromised | This policy defines how to handle devices identified as potentially compromised. Such devices may include those with an unlocked bootloader or that have failed integrity checks, and therefore pose a high security risk. You can choose one of the following actions: Allow – Allow the device to be enrolled even if it is marked as potentially compromised. Blocklist Device – Move the device into the Blocklist, preventing it from accessing resources. Factory Reset – Wipe all data and restore the device to its factory settings. Note :This setting only applies to devices enrolled with the Android Management API. |
| At Risk | This policy defines how to handle devices marked as at risk. Such devices may have outdated software, suspicious settings, or show other signs of reduced security. You can choose one of the following actions: Allow – Allow the device to be enrolled even if it is marked as at risk. Blocklist Device – Move the device into the Blocklist, preventing it from accessing resources. Factory Reset – Wipe all data and restore the device to its factory settings. Note :This setting only applies to devices enrolled with the Android Management API. |
| Windows | |
| Platform | Use this option to allow/block Windows devices from enrolling in the SureMDM console. |
| Device Model | Enter the comma-separated list of device models that allowed for the enrollment. Note: This feature is not supported for Windows EMM enrollment. |
| iOS/iPadOS | |
| Platform | Use this option to allow/block iOS/iPadOS devices from enrolling in the SureMDM console. |
| OS Version | Select the minimum and maximum OS version that allowed for the enrollment. |
| Device Model | Enter the comma-separated list of device models that allowed for the enrollment. |
| macOS | |
| Platform | Use this option to allow/block macOS devices from enrolling in the SureMDM console. |
| OS Version | Select the minimum and maximum OS version that allowed for the enrollment. |
| Device Model | Enter the comma-separated list of device models that allowed for the enrollment. |
Customize SureMDM Agent Permissions
Android
This section allows administrators to manage SureMDM Agent permissions during device enrollment in modes such as Device Owner (DO), Profile Owner (PO), Work Profile on Company Owned Devices (WPCO), and Device Administrator (DA). By unchecking specific permissions, they will not be requested during device provisioning in the selected enrollment mode. Please note that disabling certain permissions during enrollment may necessitate physical access to the device for re-enabling them later. The available permissions include:
| Permission | Description |
|---|---|
| Telecom | This permission is required for IMEI collection for inventory, contact allowlisting, tracking call logs and SMS, monitoring data usage, and locking devices and applications. App permissions include Telephone, Contacts, Call Logs, SMS, and Usage Access. |
| Remote Control | This permission is required for administrators to have complete remote control over the device, enabling precise management of gestures, hardware buttons, and navigation. App permissions include Accessibility Settings and Screen Capture. |
| Location and Geo-Fence | This permission is required for device location access for effective monitoring and management, supporting features like tracking and geofencing. App permissions include Location and Background Location. |
| App Notifications | This permission is required to control notifications for alert messages, app installations, file transfers, and compliance policies. Admin can manage and customize app notifications, choosing to hide or show specific alerts. App permissions include Notifications and Notification Access. |
| Configure System Permission | This permission is required to modify system settings, including adjustments such as system brightness, timezone, and font size, offering flexibility in tailoring the device experience. |
| Display Over Other Apps | This permission is required for remotely activating SureLock kiosk mode, enforcing message display for efficient device management and communication control. |
| Hardware Access | This permission is required to access to the camera, microphone, and nearby devices. The latter is essential for the Bluetooth Manager plugin, enabling Bluetooth device scanning, visibility to others, and communication with paired devices. App permissions include Microphone, Camera, and Nearby Devices. |
| Background Sync and App Hibernation | This permission is required for continuous SureMDM Agent operation in the background, it prevents app hibernation to avoid job and push notification failures, as well as app permission revocation. App permissions include Battery Optimization, Remove Permissions and Free Up Space. |
| Unknown Sources | This permission is required for the installation of third-party internal or business apps directly from sources outside the Google Play Store, providing flexibility and expanded app deployment options for organizational needs. |
| Samsung KNOX | This permission is required for advanced management, allowing actions such as disabling the camera, locking the screen, encrypting the device, configuring password settings, resetting the device password, setting device proxy, and performing a device wipe on Samsung devices. |
macOS
This section allows administrators to configure SureMDM Agent permissions on macOS devices for Device and ADE Enrollment types.
| Permission | Description |
|---|---|
| Full Disk Access | Required to access system data and specific administrative settings for every user on the Mac. This permission is also required for accessing files during Remote Support and installing .dmg apps. |
| Notifications | Required to display alerts and status messages for users. |
| Accessibility | Required to control the Mac via its Accessibility APIs. This permission is required for the Remote Support feature. |
| Screen Recording | Required for Remote Support to capture or record the contents of the system display. You can either prompt the user or deny the permission, but automatic granting is not permitted. |
| Microphone | Required for the Remote Support feature. You can either prompt the user with admin credentials or deny the permission, but automatic granting is not permitted. |
For each permission, below values can be selected from the dropdown.
| Permission Value | Description |
|---|---|
| Not Configured | Prompts for admin credentials to grant / deny the permission. |
| Grant | Automatically grants the specified permission without user interaction. |
| Allow Standard User to configure | Prompts the standard user to either grant or deny the permission manually. |
| Deny | Automatically denies the specified permission without prompting the user. |
Group Assignment Rules
IT administrators can create rules to automatically move devices to a specific group based on device properties such as IP address, device model, and SSID. For information on how to create a group in SureMDM, see Device Groups.
To create group assignment rules, follow these steps:
Navigate to the SureMDM Web Console > Settings (icon located at the top right of the screen) > Account Settings > Global Settings > Group Assignment Rules.
Select Enable Group Assignment Rule and click Add Rules.
Enter a Rule Name.
Click Source Group to select a group that you want to move from the Group List and click Add.
Select Include Subgroups to apply the rules for groups and subgroups.
Choose a device property from the drop-down menu, select a value, and define a rule:
- Local IP Address
- Global IP Address
- Device Model
- SSID
- Hostname
- Custom Columns
Admins can add multiple rules based on device properties.
Click Destination Group and select a group from the Group List where the source group will be moved to, and then click Add.
Click Save > Apply.
Customize Settings
Alert Template
In this section, the admins can create custom template alert messages instead of default alert messages. To configure custom alert messages for the following options, navigate to the SureMDM console > Settings (icon located at the top right of the console) > Account Settings > Customize Settings > Alert Template.
Battery Policy
Connection Policy
Data Usage Policy
Notify when device comes online
Notify when SIM is changed
Notify when device is rooted or SureMDM Agent has been granted with root permission
Invite Users
Schedule Report
Customize Toolbar
SureMDM allows the admins to create a customized job that will be added to the Dynamic Jobs section of the SureMDM Web Console.
There are two types of jobs:
Predefined Jobs - Jobs that are available by default.
User defined Jobs - Admins can create a customized job with the desired icon.
To create a User defined job, follow these steps:
Navigate to the SureMDM Web Console > Settings (icon located at the top right of the console) > Account Settings > Customize Settings > Customize Toolbar.
Under the User defined Jobs section, click Add.
On the Add Jobs prompt, a. Enter a Name.
b. Click Browse Icons and select the required icon image to be displayed for this job.
c. Select a Job from the list.
d. Click OK.
The customized job that was just created will appear in both the User Defined Jobs section and the Dynamic Jobs section. The following screenshot displays the dynamic job section available on the SureMDM homepage:
Customize the UI with Branding
SureMDM allows widespread customization options. These options allow you to brand your tools and resources according to the color scheme, logo, and customized title on the title bar of the console.
To brand the SureMDM Web Console with desired text or a logo, follow these steps:
Navigate to the SureMDM Web Console > Settings (icon located at the top right of the screen) > Account Settings > Global Settings > Branding Info.
Configure the following branding settings and click Apply.
Use Logo: Select this option to upload the logo of the company or any desired image file.
Title: Enter the desired text that will be displayed on the title bar of the console.
Sub-Title: Enter the desired text to appear in small font below the logo or title.
Logo Path: Allows to upload a required Logo image. The Logo Path option is visible only if the Use Logo option is enabled.
Message Footer: Enter the desired text to appear in the footer of all messages sent from the console
Global Search
Global Search allows admins to search for devices in all the groups/subgroups of the SureMDM console. This option is available under Settings (icon located at the top right of the console) > Account Settings > Miscellaneous Settings > Enable Global Search.
With Global Search, administrators can easily locate devices across all groups and subgroups in the SureMDM console, regardless of their current location within the console. For example, if you are in Group/Subgroup A, you can still find a device that belongs to Group/Subgroup B using Global Search.
Enable Auto Search: The option allows you to search for devices within a selected group or subgroup without requiring you to press the enter key. This option is available under Settings (icon located at the top right of the console) > Account Settings > Miscellaneous Settings > Enable Auto Search