Media Injection
Overview
The Media Injection feature lets you feed images or videos directly into the camera stream of browser sessions or Android mobile applications (APKs) during an AstroFarm session. This enables seamless testing of camera-dependent workflows like QR code scanning or facial recognition without requiring physical devices or a live camera feed.
Use Cases
Many applications rely on real-time camera input for workflows like KYC verification, barcode scanning, or document uploads. Testing these scenarios traditionally requires physical device setup, repeated manual effort, and inconsistent conditions.
With Media Injection, you can simulate camera input by injecting predefined media directly into a browser session or a selected app. This ensures:
- Consistent test conditions across all environments
- Faster execution of camera-dependent test cases
- Repeatable and automation-friendly workflows with no manual camera handling
One-Time Setup
Before using Media Injection, complete the one-time setup for your preferred injection mode.
Browser-Based Injection
You need to enable a Chrome flag on your device. This is required only once.
Open Chrome in your AstroFarm session.
Navigate to:
chrome://flags/#enable-command-line-on-non-rooted-devices
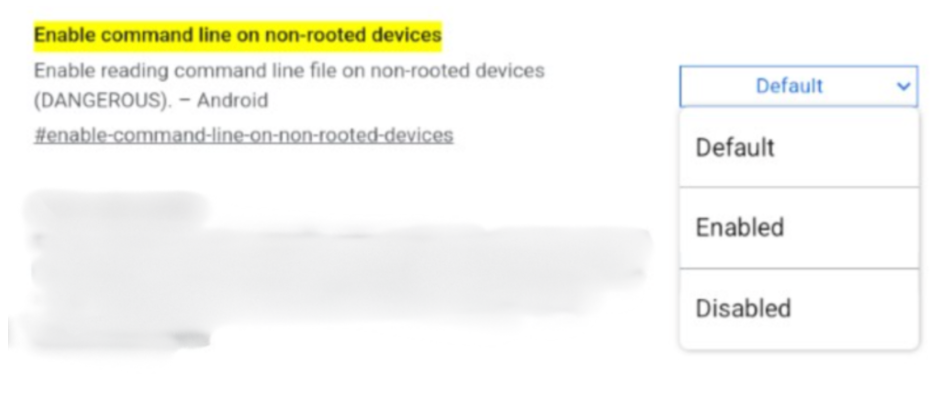
Set the flag to Enabled.
Click Relaunch. Chrome will restart — this is expected.
Application-Based Injection
Image Injection must be enabled for each APK. You can do this during upload or for existing apps.
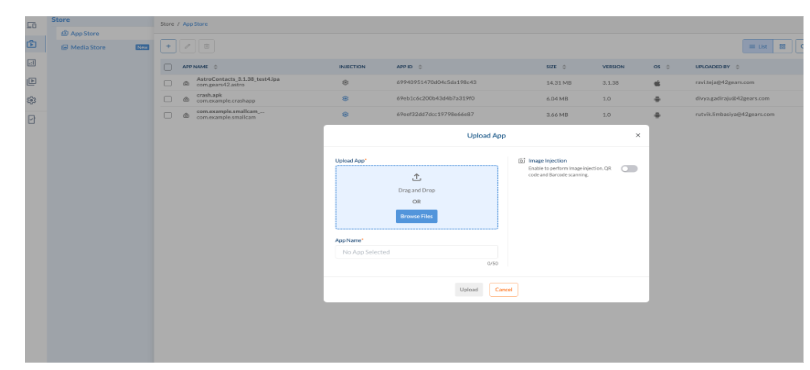
Option A — During App Upload
- Navigate to App Store → Upload App.
- Upload your APK.
- Toggle Image Injection ON in the upload modal.
- Complete the upload
Option B — For Existing Apps
- Navigate to the App Store and locate your app.
- Click the Settings (⚙️) icon next to the app.
- Enable Image Injection and save the configuration.
Injecting Media
Once setup is complete, follow these steps from the AstroFarm Dashboard:
- Open the AstroFarm Dashboard and locate the Media Injection panel.
- Toggle Media Injection ON.
- Select your injection mode: Browser-Based or Application-Based.
- Upload your media using Browse from Computer (drag & drop or select a file) or choose an asset from Media Store.
- Click Inject.
For Application-Based Sessions:
- Select the target application from the dropdown.
- Launch the app and trigger the camera flow.
For Browser-Based sessions:
- Open your web application and trigger the camera flow.
✅ Result: The uploaded media appears as the live camera input in the selected browser session or application, based on the chosen mode.
Supported Formats & Browsers
| Type | Formats | Max Size | Browser | Application |
|---|---|---|---|---|
| Image | .jpg, .jpeg, .png | 10 MB | Supported | Supported |
| Video | .mp4, .mov | 50 MB | Supported | Not Supported |
| Y4M | .y4m | 300 MB | Supported | Not Supported |
- Supported browsers: Chrome, Edge, Brave, and Opera (Android). All Chromium-based browsers are supported.
- Supported Android camera APIs: camera, camera2, CameraX, and ImageReader. If your APK uses a different camera implementation, media injection may not work as expected.
Important Notes
- Injection is mode-specific; browser and application flows are fully isolated from each other.
- Application-based injection requires that the APK has Image Injection enabled.
- Browser-based injection does not affect native applications.
- Application-based injection does not affect browser sessions.
- Apps must actively use camera functionality for injection to work.