Integrate SureMDM with Cisco ISE (Identity Services Engine)
Cisco Identity Services Engine (ISE) provides intelligent integrated protection through intent-based policy and compliance solutions. SureMDM’s integration with Cisco ISE ensures network security while business endpoints are accessing the company's network. It also helps you to give definite access privileges to the endpoints managed by 42Gears based on compliance rules defined by your organization.
 Note: Cisco ISE integration is available only for Enterprise licenses.
Prerequisite
Enterprises should have a Cisco ISE server.
To integrate SureMDM with Cisco ISE, follow these steps:
- Log into the SureMDM Web Console.
- Navigate to Settings > Account Settings > Enterprise Integrations > Cisco ISE Integration.
- On the Cisco ISE Integration page, select Enable Cisco ISE Integration.
- Enter the desired Username and Password, and click Save.
Note: This credential will be used to configure SureMDM in the Cisco ISE server.
Now, you need to generate a certificate to establish a secure connection between Cisco ISE and SureMDM servers.
5. Generate certificate (PEM file) for the desired SureMDM URL using the following command on the Linux machine:
openssl s_client -showcerts -connect <SureMDM Server URL>:443 </dev/null 2>/dev/null|openssl x509 -outform PEM > 42gearscertfile.pem
Note: URL for DNS should be changed accordingly.
6. Log into the Cisco ISE server and navigate to Administration > Systems > Certificates > Trusted Certificates and then upload the generated certificate (PEM file).
Note: Ensure Validate Certificate Extension is not selected.
7. Navigate to Administration > Network Resources > ExternalMDM to add SureMDM to Cisco ISE.
8. Click Add and fill the following details:
- Name: Give a desired name
- Server Type: Select Mobile Device Manager from the drop-down list
- Authentication Type: Select Basic from the drop-down list
- Hostname/IP address: Enter the Domain Name
Note: Domain name of your SureMDM console.
- Port: Enter the Port no.443
- Instance Name: Enter the SureMDM Account ID (Navigate to SureMDM Web Console and click the Settings icon located at the top right of the screen to see the SureMDM Account ID)
Note: Instance Name should follow the pattern: ciscoise/{Account ID}.
- Username/Password: Enter the credentials created in SureMDM. Refer to step no.4.
- Description: Enter the description
- Polling Interval: Enter the polling interval
Note: Polling Interval is the time taken for the SureMDM server to send data to the ISE server.
- Time Interval For Compliance Device ReAuth Query: Enter the time
Note: This is the waiting time for the Cisco ISE server to provide results on the compliance status of devices.
- Status: Select Enabled

9. Click Test Connection to check whether ISE can communicate with SureMDM.
Ensure that you get the connection successful message.
10. Click Submit to save the configuration.
On successful configuration, SureMDM will list under Administration > Network Resources > External MDM > MDM Servers.
11. Navigate to Administration > ISE Policy > Policy Sets.
12. Select Policy > Authorization Rules.
You can configure suitable policy sets based on business needs.
Note:
1. Policies are evaluated from top to bottom, so be sure of your authorization rules.
2. At least one compliance authorization rule has to be deployed on the device for the device to be compliant.
The following screenshot is just an example. The policy sets may vary based on your requirements.

13. Enroll the device to SureMDM, deploy the suitable compliance jobs, and then, try connecting to the enterprise endpoint. If the device is compliant, it will be granted access by the MDM solution.
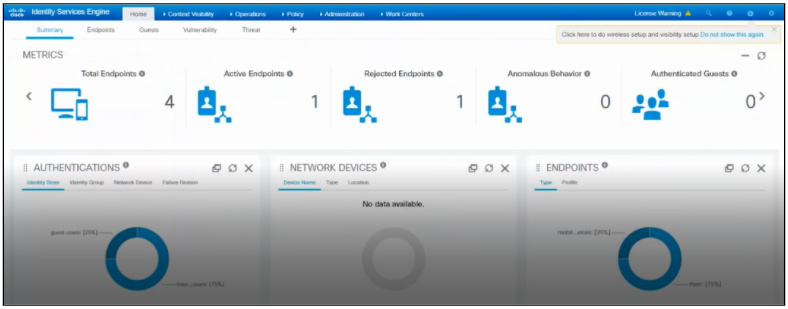
The following screenshot shows the number of endpoints that are compliant as Active Endpoints and the number of endpoints that are non-compliant as Rejected Endpoints on the Cisco ISE server.