Upgrade and Migration of Single Server Architecture
Steps for the Single Server Architecture Deployment
Overview
This guide provides a step-by-step, enterprise-standard procedure to install and configure SureMDM On-Premise using K8sOpInstaller. It is written to enable administrators to complete the installation end-to-end with minimal assistance while preserving all original installer prompts, options, and system outputs.
Prerequisites
Ensure the following requirements are met before starting the installation.
System Requirements
- Minimum 100 GB of available disk space
- Root or sudo access on the target system
Network Requirements
Ensure the following ports are accessible.
External Connectivity
- 443/tcp
- minioPort
Internal Connectivity
- 80/tcp
- 1433/tcp
- 2379–2380/tcp
- 6443/tcp
- 10250/tcp
- 27017/tcp
- 8472/udp
- 9090-9093/tcp
Additional requirement:
- DNS name resolution must be working correctly
Database Requirements
- SQL Server instance
- MongoDB instance
- Appropriate database credentials with required permissions
Pre-Upgrade Steps
Before starting the application upgrade, ensure the following prerequisites are completed:
Back Up Your Environment
Take a complete backup of all critical components, including:
- Application folder (k8sopinstaller)
- SQL database
- MongoDB databases
- MinIO storage directory
Upgrade MongoDB
Upgrade your MongoDB instance to version 7.0.x before proceeding with the application upgrade.
For detailed instructions, refer to the official MongoDB documentation: https://www.mongodb.com/docs/manual/release-notes/7.0-upgrade-standalone/#std-label-7.0-upgrade-standalone
Any additional configurations may be reverted during the upgrade process.
After completing the above pre-upgrade tasks, proceed with the installation package preparation on the master and agent nodes.
1. Prepare Installation Packages
Step 1.1: Download and Extract Packages
Download the SureMDM On‑Premise installation packages provided by 42Gears and extract them on the target Linux server.
Step 1.2: Move Offline Images
Move the offline-images directory into the k8sopinstaller directory.
sudo mv offline-images k8sopinstaller
Step 1.3: Set Required Permissions
Navigate to the k8sopinstaller directory and grant the required permissions:
cd k8sopinstaller
sudo bash permissions.sh
Output:
Permission Configuration
Working Directory: /home/administrator/k8sopinstaller

File and directory permissions have been configured successfully.
2. Start the Installer
Step 2.1: Launch Installer
Run the SureMDM On‑Premise installer.
sudo ./k8sopinstaller
System Response:Starting K8sOpInstaller... SureMDM OnPremise Installer Thank you for selecting SureMDM OnPremise for your deployment.
3. Prerequisites Checklist
The installer displays a prerequisites checklist. Review and confirm all requirements are met.
System Requirements
- Minimum 100 GB disk space
- Root or sudo access
Network Requirements
- External: 443/tcp, minioPort
- Internal: 80/tcp, 1433/tcp, 2379–2380/tcp, 6443/tcp, 10250/tcp, 27017/tcp, 8472/udp, 9090-9093/tcp
- DNS resolution must be functional
Database Requirements
- SQL Server
- MongoDB instance
- Database credentials with CREATE/ALTER permissions
Storage Requirements
- AWS S3 bucket or
- MinIO server with valid credentials
Prompt:
Press [Esc] if you wish to exit. Press any key to continue:
4. Required Packages and Pre‑Checks
The installer runs pre‑installation and prerequisite package checks.
System Response:
Running pre-installation checks...
Prerequisite Packages
5. Setup Type Selection Step 5.1: Select Setup Type On Screen:
- Single Server Setup
- Complete SureMDM installation on this server
- Includes database, application, and web services
- Automatic IP detection and configuration
- Multi-Server Setup
- Distributed installation across multiple servers
- Manual database and service configuration required
- Advanced setup for enterprise deployments
Enter your choice (1 or 2):
User Input:
For example, 1
System Response:
Selected: Single Server Setup
6. Disk Space and IP Detection
Disk Space Check
Checking available disk space... Completed! Disk space check passed Available: [Occupied_storage] GB (Required: 100 GB)
IP Address Detection
Detecting machine IP addresses... Completed!
Connection String Generation
> Generating single server database connection strings... Completed!

> MongoDB: mongodb://<ipaddress>:27017/
7. Device Capacity Confirmation
Prompt:
Could you kindly specify the number of devices you plan to manage within your setup: [Device_count]
Do you wish to continue? Yes[y] or No[n]: y
8. Install Prerequisites
Prompt:
Press 1 to Continue; Press 2 to Exit: 1
System Response:
Prerequisites installed successfully.
9. Import Dependencies
Dependencies imported successfully
10. SQL Server Configuration
Step 10.1: Enter SQL Server Details
Enter SQL Server IP address or hostname: 10.1.x.xx The installer displays the selected SQL Server:
> Selected SQL Server: SQL Server (<ipaddress>:1433)
Next, provide SQL Server credentials:
Enter SQL Server username (default: sa): sa Enter SQL Server password:
The installer then tests the SQL Server connection.
Result: You are successfully connected to SQL Server IP: [ipaddress]
Confirm SQL Server Selection
The installer asks whether to proceed with the current SQL Server:
Press 1 to Proceed with this SQL Server Press 2 to change to a different SQL Server User Input Your choice (1 or 2): 1
Successful SQL Configuration
Once confirmed, the installer completes SQL Server setup:
✅ SQL Server connection setup completed successfully
✅ SQL Server configuration generated
- Username: sa
- Database: suremdmdb
SQL Configuration is Successful.
Outcome
- SQL Server connectivity is validated
- Database suremdmdb is configured successfully
- Installation proceeds to the next step
11. MongoDB Configuration
The installer connects to the MongoDB server automatically:
Connecting to MongoDB server... Completed! MongoDB Configuration is Successful.
If the connection is successful, the following message is displayed:
You are successfully connected to MongoDB Server Connection String: mongodb://10.1.x.xx:27017/
User Confirmation
The installer asks whether to proceed with the detected MongoDB connection string:
Press 1 to Proceed Press 2 to Change Choice: 1
User Input
- Enter 1 to continue with the displayed MongoDB server
- Enter 2 to modify the MongoDB connection details
Result
After confirmation, the MongoDB configuration completes successfully:
MongoDB Configuration is Successful.
12. Storage Configuration (MinIO)
SureMDM requires object storage for jobs, icons, and reports. The installer supports AWS S3 and MinIO.
Storage Provider Selection
The installer displays available storage options:
- Configure AWS S3 bucket for Storage
- Configure MinIO bucket for Storage Please enter your choice: 2
User Input
- Enter 1 for AWS S3
- Enter 2 for MinIO (on-premise or private cloud)
MinIO Configuration Inputs
When MinIO is selected, provide the following details:
Enter MinIO Service URL: <minio server url>
Enter MinIO Bucket Name: suremdm-jobs
Enter MinIO Access Key: <MinIO Access Key>
Enter MinIO Secret: <MinIO Secret Key>
Enter MinIO Region (default: us-east-1): <minio region>
Enter MinIO Icon Bucket Name: suremdm-icons
Enter MinIO Report Bucket Name: suremdm-reports
Ensure that the specified buckets already exist and the credentials have read/write permissions.
Result Storage configuration is completed using MinIO as the backend.
13. SSL Certificate Configuration
SSL certificates are mandatory to enable secure HTTPS access to the SureMDM console and APIs. The installer begins SSL setup:
SSL certificates are required for secure HTTPS access. Configuring SSL certificates...
Domain (FQDN) Input
Enter the Fully Qualified Domain Name (FQDN) for SureMDM:
FQDN (Example: test.abc.io): [FQDN]
The installer confirms the selected domain:
Using domain: [fqdn]
Certificate File Inputs
Ensure the SSL certificate and private key files are available in the following directory:
appdata/certs
Provide the file names when prompted:
Enter SSL Certificate file name: [fullchain.crt] Enter Private Key file name: [private.key]
SSL Configuration Summary
The installer displays a summary before applying the configuration:
Domain: [FQDN] Certificate: [fullchain.crt] Private Key: [private.key]
SSL setup completes successfully:
Setting up SSL certificates... Completed!
14. Messaging Subsystem Setup
The installer configures the internal messaging subsystem required for SureMDM services.
Messaging subsystem setup done
No user input is required during this step.
15. Core Application Deployment
In the final phase, the installer deploys and initializes all SureMDM core services and applications.
SureMDM core services configured successfully SureMDM applications installed successfully Installation finalized successfully System optimization completed successfully
Installation Completion
The installer confirms successful completion:
SureMDM OnPremise Installer completed successfully**
CORE INSTALLATION COMPLETED SUCCESSFULLY**
16. Additional Setup Options
After the core installation is complete, the installer allows you to configure additional SureMDM services.
These services are optional and can also be configured later using the command:
./k8sopinstaller setup <Setup_name>
Prompt Displayed:
Would you like to configure additional services now? (yes/no) [no]:
User Input yes
Available Setup Options
Once enabled, the installer displays the list of configurable services:
| Configurable Services | Description |
|---|---|
| ABM | Configure Apple Business Manager (ABM) settings |
| AndroidEnterprise | Configure Android Enterprise settings |
| FCM | Configure Firebase Cloud Messaging settings |
| GoogleMaps | Configure Google Maps settings |
| IOSmacOS | Configure iOS and macOS settings |
| IoT Communication Services | Configure IoT Communication Services settings |
| MailServer | Configure mail server settings |
| SureMDMHub | Configure SureMDM Hub settings |
| WindowsCE | Configure Windows CE protocol settings |
| WindowsPushNotification | Configure Windows Push Notification settings |
0. Exit to the command line
Enter the number corresponding to the service you want to configure, and follow the on-screen instructions.
17. Configuring Additional Services Later
To configure services later, use:
sudo ./k8sopinstaller setup
To configure a specific service directly:
sudo ./k8sopinstaller setup [ServiceName]
Example:
sudo ./k8sopinstaller setup ABM
The user can follow the on-screen instructions to configure the service.
- Download and extract the Migration Tool on the SureMDM Server. The link to download this tool will be shared with you by the 42Gears Sales team.
a. The system admins should have super-user permissions to run the tool. b. Make sure SQL DB, MongoDB, and Minio work fine before we begin the migration process.
- Once you extract the Migration tool, navigate to the Suremdm Migration Tool folder in the tool and execute the below-mentioned command to give executable permissions to the SureMDM_Migrator tool.
sudo chmod +x SureMDM_Migrator
Once the user runs the above command, execute the below-mentioned command.
sudo ./SureMDM_Migrator
- This will prompt the system admin with the following options. The system admin will need to select the 1st option to proceed.
i. Configure application settings ii. Migrate my data iii. Exit
- Further, enter the SQL DB and MongoDB details.
If MongoDB is hosted on the same machine, the system admins can hit Enter to configure MongoDB. The system admins can check the connection string mongodb://192.168.x.xx:27017 for reference.
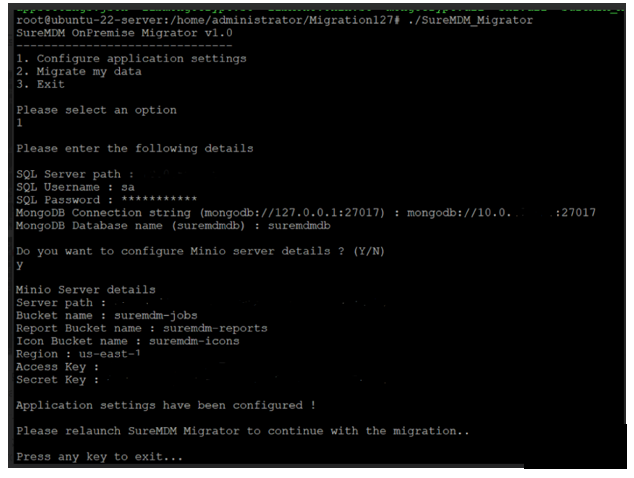
- Once the App Settings are configured, Exit the tool and Relaunch it by using the below command:
sudo ./Suremdm_Migrator
- Now, select option 2 which is Migrate my Data to start the migration.
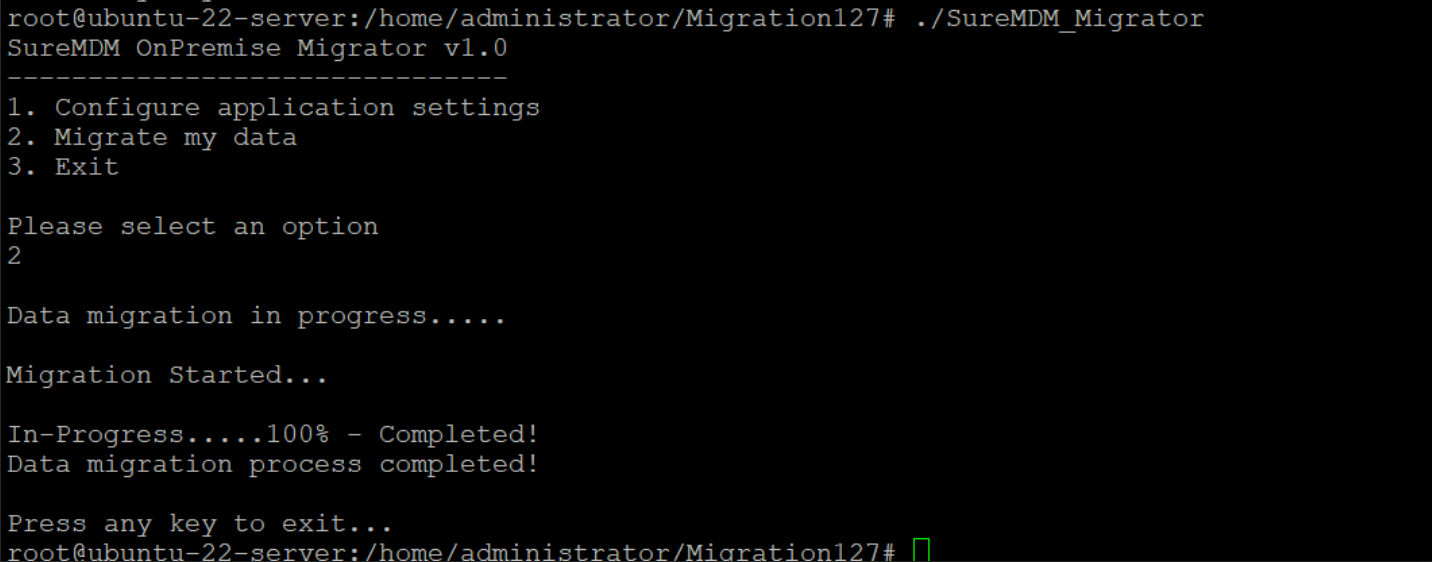
- Once the migration is complete, Exit the tool. Now, you can start using the SureMDM console.