Configure SureMDM Nix Agent for Nix AD Enrollment
To configure SureMDM Nix Agent for Nix AD Enrollment, follow these steps:
1. Install SureMDM Nix Agent on your device from Google Play Store.
2. Enroll the device on SureMDM Web Console where Nix AD Auth configuration is done.
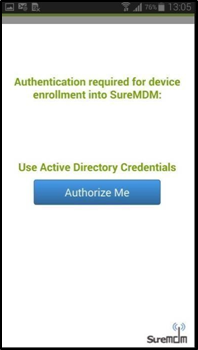
3. Authentication page will be displayed on SureMDM Nix Agent.
4. Click Authorize Me and enter the credentials of Active Directory.
Once completed, SureMDM Nix Agent will be enrolled with the Active Directory Name.
List of helpful PowerShell commands
To list existing clients, run the below commands in PowerShell:
Get-AdfsClient -ClientId "39F803D4-B2E7-4D65-8CBA03734FA3AFC7suremdm- nix-oauth"
Get-AdfsClient -Name "OAUTH2 SureMDM Nix Client"To remove existing clients run the below commands in PowerShell:
Remove-ADFSClient "OAUTH2 SureMDM Nix Client2"