Upgrade from styx v6.62.0 to Styx v1.7.1
Steps to Install K3s on the SureMDM Server:
The SureMDM server on which the system admin first installs K3s becomes the Master Node, and the other SureMDM servers become Agent/Worker Nodes.
Follow the below steps to Install K3s on the SureMDM Server:
1. Run the below command to install K3s on a Master Node:
curl -sfL https://get.k3s.io | K3S_KUBECONFIG_MODE="644" INSTALL_K3S_EXEC="server --disable=traefik" sh -
2. Run the following command to restrict kubectl access only to sudo users:
sudo chmod 600 /etc/rancher/k3s/k3s.yaml
3. Run the below command to get a token from Master Node.
sudo cat /var//lib/rancher/k3s/server/node-token
4. Run the following command on other agent nodes:
curl -sfL https://get.k3s.io | K3S_NODE_NAME=$HOSTNAME K3S_URL=https://\IP of server\:6443 K3S_TOKEN=\token\ sh -
- K3S_URL - Enter the IP of Master Node.
- K3S_TOKEN - Enter the token obtained from the previous command.
Example of token format:

5. Once done, you can check the status of the all nodes using the following command:
kubectl get nodes
The following output can be seen:

6. Download and import the offline images for SureMDM Deployment:\ The system admins should download the offline images (Please refer to General Requirements for details) using the link provided by the 42Gears Support team and import them into the SureMDM Server.
Follow the below steps to import the images:
a. Navigate to the directory where the images are located and execute the following command:
sudo k3s ctr images import image_name
Replace image_name in the above command with the actual name of the image file.
b. Similarly, import each image individually on all the Master and Agent nodes.
The system admins can run the below command to view the list of all imported images:\ sudo k3s ctr images ls
To upgrade and migrate styx v6.62.0 to Styx v1.7.1, follow below steps:
1. When the Master and Agent nodes are ready, download the build file (k8sopinstaller) and extract it.
If the system admin has already deployed /suremdm with styx v 6.62.0, please follow the below-mentioned steps to configure /suremdm in styx v1.7.1 before proceeding with the migration process. The following configuration is only for the migration:
a. Navigate to the k8sopinstaller directory, open the file Super_install.sh and edit the following configuration in line no 387 and save it:
- Enclose the dns_name within curly brackets{} and add /suremdm after it.
- For example - ip=$(echo https://${dns_name}/suremdm)
b. Navigate to the k8sopinstaller \ Ssl_setup, open the ssl_setup.sh file, and remove the following line located at the end of the file.
- rm temp_ingress.yaml
c. Navigate to the k8sopinstaller \ Manifest \ deployment, open the Deployment_htmlhydra.yaml file, edit the following configuration, and save it:
- Insert the word suremdm before htmlhydra in the following image tag
containers:
- name: htmlhydra
image: onpremise/htmlhydra:MR-103-7.35.8
imagePullPolicy: Never
- For Example - image:onpremise/suremdmhtmlhydra:MR-103-7.35.8
d. Once upgrade and migration is successful, navigate to Manifests \ ingress-nginx and execute the following command to run the ingress-suremdm.yaml file:
sudo kubectl apply -f ingress-suremdm.yaml
2. Navigate to the k8sopinstaller folder, and run the following command in the terminal:
- sudo bash upgrade_legacy.sh
3. Next, enter the following SQL DB server details:
- SQL Server path: (IP address of windows machine where SQL DB is hosted)
- SQL Server username: (User can take these credentials from SureMDM configurator)
- SQL Server password: (User can take these credentials from SureMDM configurator)
4. Enter the following MongoDB server details:
- Mongo Server connection string: (IP address of machine where MongoDB is hosted ex. mongodb://\mongo_server_ip\:27017)
5. Once the MongoDB index has been created, run the following script:
- sudo bash super_install.sh
6. The system admins can skip the SQL DB and MongoDB setup and proceed with the following configurations:
7. Next, choose the Storage Configuration setup from the following command:
Storage setup for SureMDM
1. I want to configure storage with AWS S3 buckets now.
2. I want to configure storage with MinIO buckets now.
3. Skip storage settings.
If the system admins select option 1, then the following AWS S3 bucket details must be provided:
AWS S3 Bucket Name:
AWS S3 Icon Bucket Name:
AWS S3 Access Key:
AWS S3 Secret Key:
AWS S3 Region:
AWS S3 Report Bucket Name:
AWS S3 Report Access Key:
AWS S3 Report Secret Key:
AWS S3 Report Region#8202;:
If the system admin select option 2, then the following MinIO bucket details must be provided:
Minio Bucket Name:suremdm-bucket
Minio Icon Bucket Name:suremdm-icons
Minio Access Key:suremdm-api-key
Minio Secret Key:suremdm@42Gear$
Minio Region:us-east-1
Minio Service URL: https://xxxxxx.abc.com
Minio Report Bucket Name:suremdm-reports
The system admins are recommended to have two S3 buckets (one bucket will be used for jobs and reports, while the other will be used for applications icons).
If the storage settings have already been configured, choose option 3 to skip ahead.
8. Choose the Kafka setup from the following command:
Kafka setup for SureMDM
1. I want to configure Kafka now.
2. Skip Kafka setup.
- Option 1 - Choose this option to configure Kafka inside the cluster.
- Option 2 - If Kafka was already set up in an earlier installation attempt, choose option 2 to skip ahead.
9. The next step is to enter the mapped DNS without the HTTPS protocol:
Please enter your DNS: abcd.42gears.com
- The system admins must provide the DNS without the subpath extension (/suremdm).
- If the system admins wish to deploy SureMDM on-premise on a port other than 443, they can specify it, for example: abc.suremdm.com:8447.
10. SSL Certificate Configuration:
Kindly provide your certificate and private key in 'appdata/certs'. If already updated, please wait for input and proceed.
Enter the file name of the certificate added (should be of the format [file_name.extension]):
Enter the file name of the private key added (should be of the format [file_name.extension]):
11. Select the FCM configuration based on the requirements:
FCM configuration:
Do you wish to continue with FCM configuration? Yes[y] or No[n]:
If the system admins want to continue with the FCM configuration, they can enter "y" by providing the following details; otherwise, they can enter "n".
FCM Project ID:
FCM Server API Key:
FCM Application ID:
FCM Sender ID:
Please enter the name of .json file present in the appdata/pluto directory.(Example:[file_name.json]):\
Click hereto learn how to generate the FCM key.
12. Select the Google API key configuration based on the requirements:
Google Maps configuration:
Do you wish to use Google maps with the SureMDM setup? Yes[y] or No[n]:
If the system admins want to continue with the Google API key configuration, they can enter "y" by providing the Google API key; otherwise, they can enter "n".
Google API Key:
Google API key should be purchased by the customer. Otherwise, the system admins can use the default OpenStreet maps available in SureMDM.
13. Select the iOS and macOS configurations based on the requirements:
iOS and macOS configuration:
Do you wish to continue with iOS and macOS configuration? Yes[y] or No[n]:
If the system admins want to continue with the iOS and macOS configuration, they can enter "y" by providing the DefaultPush certificate password; otherwise, they can enter "n".
Default Push Certificate Password:
14. Select the Android Enterprise configuration based on the requirements:
Android Enterprise configuration:
Do you wish to continue with Android Enterprise configuration? Yes[y] or No[n]:
If the system admins want to continue with the Android Enterprise configuration, they can enter "y" by providing the following details; otherwise, they can enter "n".
Enter the name of the MsaAccountCertificate added (should be of the format [file_name.p12]):
Enter the name of the EsaAccountCertificate added (should be of the format [file_name.p12]):
MSA Account Email:
ESA Account Email:
15. Select the Mail configuration based on their requirements:
Mail server configuration:
Do you wish to continue with Mail server configuration? Yes[y] or No[n]:
If the system admins want to continue with the Mail configuration, they can enter "y" by providing the following details; otherwise, they can enter "n".
Mail server:
Mail user:
Mail password:
Mail Server Backup:
16. Select Windows Push Notification Configuration based on the requirements:
Do you wish to continue with Windows push notification configuration? Yes[y] or No[n]:
If the system admins want to continue with the Windows Push Notification configuration, they can enter "y" by providing the following details; otherwise, they can enter "n".
Package_Family_Name:
SID:
Client_secret:
17. Select the MQTT Gateway (Things enrollment) configuration based on the requirements:
Do you wish to continue with MQTT gateway configuration? Yes[y] or No[n]:
If the system admins want to continue with the MQTT Gateway (Things enrollment) configuration, they can enter "y"; otherwise, they can enter "n".
Public access should be allowed for Port 1883.
18. Select the SureMDM Hub configuration based on the requirements:
Do you wish to continue with SureMDM Hub configuration? Yes[y] or No[n]:
If the system admins want to continue with the SureMDM Hub configuration, they can enter "y" by providing the following details; otherwise, the system admin can enter "n".
SureMDM Hub Email-ID:
SureMDM Hub Company Name:
- The default admin user for SureMDM Hub will be username with Administrator.
- For a new setup of SureMDM Hub, run the following three queries:
1) Click here to get the MongoDB query for SureMDM Hub
2) Click here to get the SQL DB query to connect account ID 1 to SureMDM Hub
3) Click here to get SQL DB query for SureMDM Hub
19. Once the deployment is done, add the licenses using new license key with the help of following queries:
- If it is single tenant deployment, click here.
- If it is SureMDM Hub deployment, click here.note
System Admin must run these SQL queries in suremdmdb.
20. Make sure all pods are running before we start the migration.
21. Download and extract the Migration Tool on the Windows machine where SQL DB or MongoDB or FTP is hosted.
If the system admin is migrating data from FTP to MinIO, please add the File name extension and MIME Type values mentioned in the screenshot below:
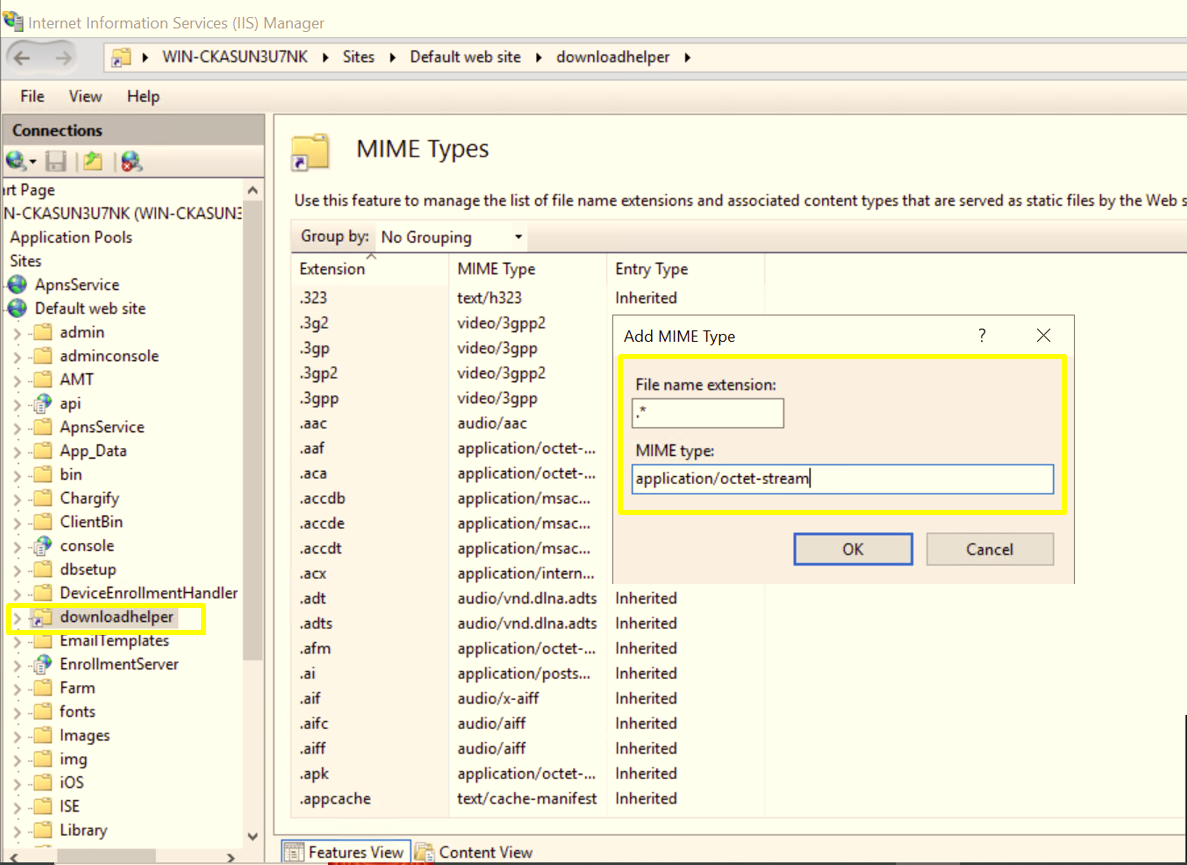
Once done, please add an additional MIME type using “.” as a File Name Extension.
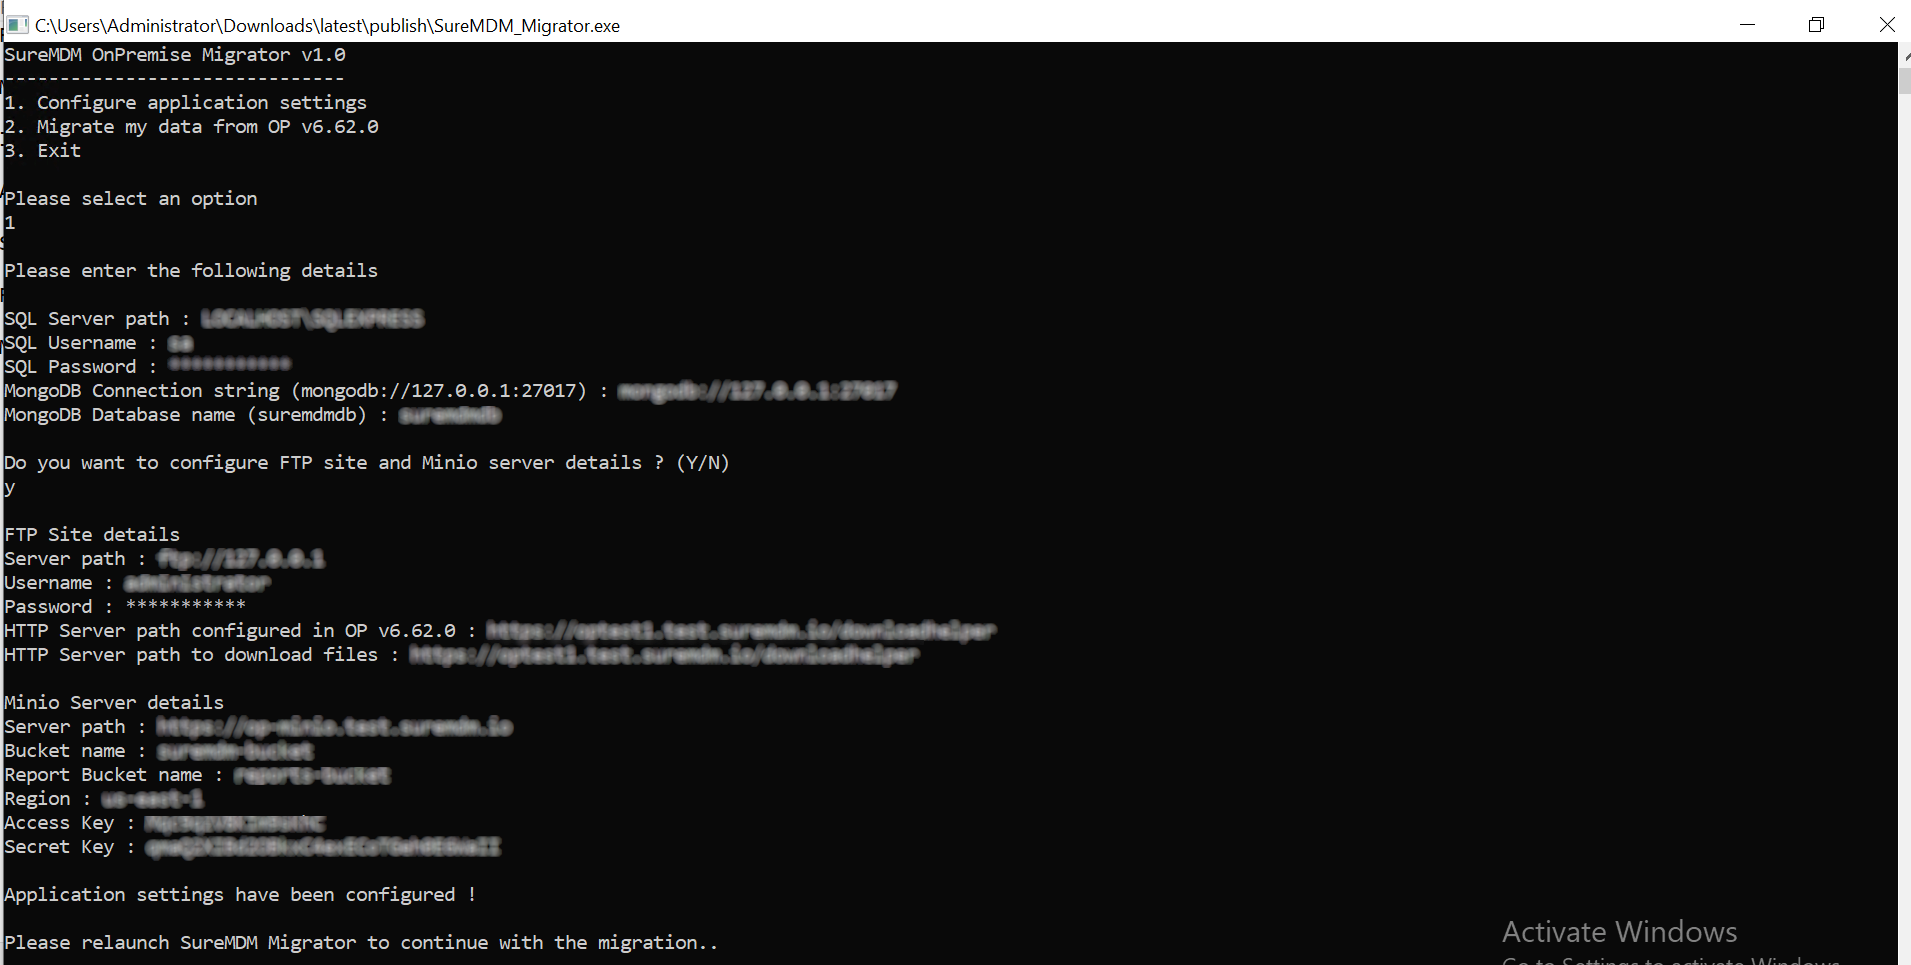
22. After completion, go to the /publish directory (found within the extracted Migrator Tool folder) and execute SureMDM_Migrator.exe. The system admin will see the following options:
1. Configure application settings
2. Migrate my data from OP v6.62.0
3. Exit
23. Choose option 1, then enter the SQL DB and MongoDB details. If system admins had a deployment with FTP storage in Styx v6.62.0, they can proceed with providing both FTP and MinIO details. Otherwise, the system admin can skip the FTP details and only provide the Amazon S3 icon bucket information.
The SureMDM App Icon Bucket should have public access to allow for downloads. Click [here](DeploymentGuideforSureMDMOn-Prem.md#_7pd3yo1lwuuo) for more info.
The system admins can simply hit enter to provide default values for the MongoDB connection string and MongoDB Database name.
1. Make sure Minio is working fine before we begin the migration.
2. Provide the following HTTP server path value to download the files:
http://localhost/downloadhelper, if deployment is with /suremdm then http://localhost/suremdm/downloadhelper
24. Once the app settings are configured, please exit the tool and relaunch it.
25. Select option 2 to start the migration.
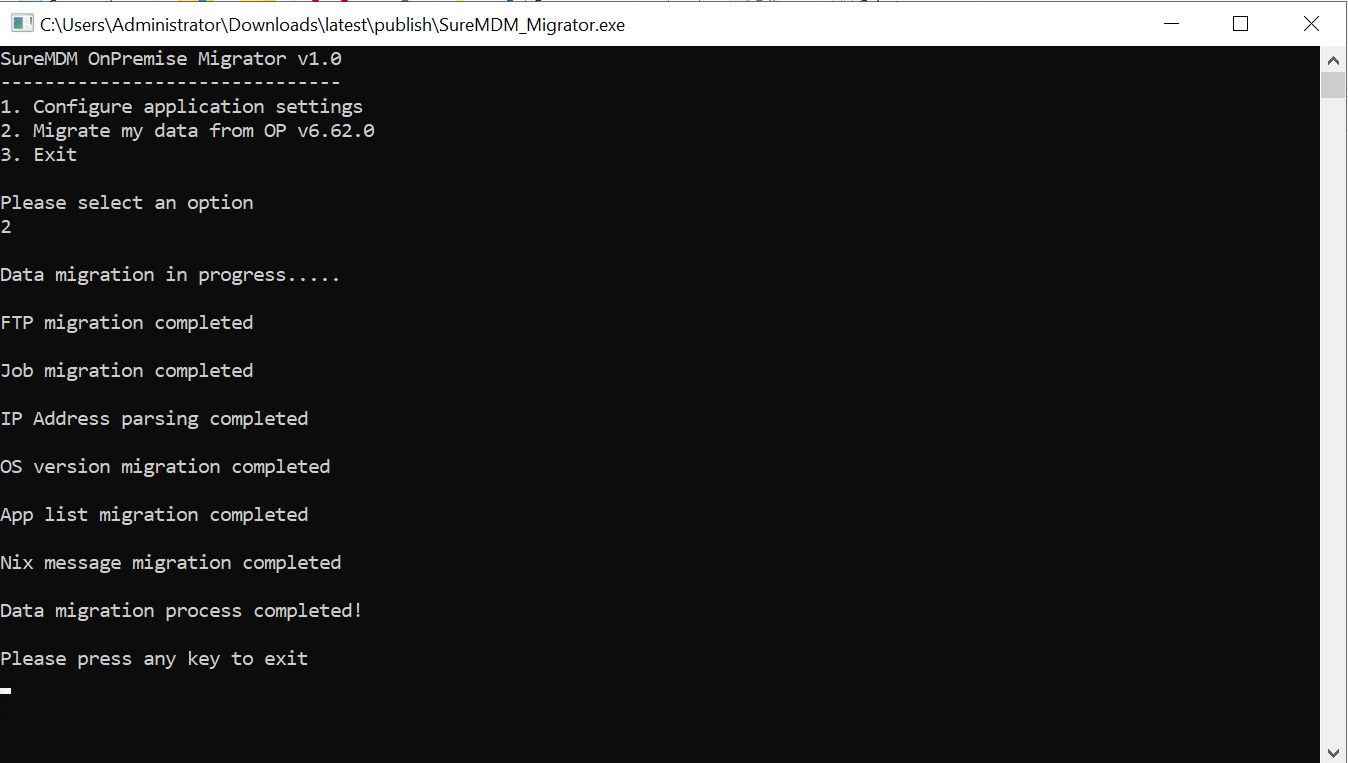
26. Once the migration is complete, please exit the tool and map DNS to the SureMDM Server.
Run the following command to obtain the IP address to which DNS should be mapped.
sudo kubectl get ingress -n suremdm
This below point is applicable only for those users having the deployment with /suremdm.
- Navigate to Manifests \ ingress-nginx and execute the following command to run the ingress-suremdm.yaml file to complete setup for /suremdm support:
sudo kubectl apply -f ingress-suremdm.yaml
27. In the IIS Manager on the Windows machine, stop the Reports service and the SureMDM-related application pool.
Once k3s setup is stable please delete the report service and SureMDM related application pool.
28. Run the below-mentioned SQL DB and MongoDB queries to set up the SureMDM Hub console:
- Click here to get the MongoDB query for SureMDM Hub
- Click here to get the SQL DB query to connect account ID 1 to SureMDM Hub
- Click here to get SQL DB query for SureMDM Hub
- If a customer is upgrading from Styx v6.62.0 to Styx v1.7.1 and wishes to set up SureMDM hub in the new architecture, kindly execute the three queries given in points (a), (b), and (c) above.
- If a customer is upgrading from Styx v6.62.0 to Styx v1.7.1 and has previously configured SureMDM Hub in Styx v6.62.0, and wishes to retain its use in the new architecture, please execute the two queries provided in points (a) and (b) above.
29. For the SureMDM Hub console, the super user needs to reset the password for all SureMDM Hub admin users.
30. Please contact the 42Gears support team for the Activation code or License key.
Please contact the 42Gears support team to get a new Perpetual key/Activation code.
31. Please log into the SureMDM console and check all the data.