Configure Settings in SureMDM Web Console (OneLogin)
To configure SSO settings in SureMDM Web Console, follow these steps:
 Note: Log into SureMDM Web Console as a Super user.
1. Navigate to SureMDM Web Console > Settings (icon located at the top right of the screen) > Account Settings > SAML Single Sign-On.
2. Configure Single Sign-On settings for onelogin.
|
Settings |
Description |
|
Enable Single Sign-On |
Select this option to allow configuring Single Sign-On settings. |
|
SSO Type |
Select onelogin. |
|
Service Identifier |
Enter the Service Identifier. This value is present under EntityDescriptor > IDPSSODescriptor > SingleSignOnService (node with HTTP-Redirect binding) > Location Fetch these values from the certificate downloaded in step no.7, Configure settings in onelogin server. For example: https://app.onelogin.com/saml/metadata/651423 |
|
Sign On Service Url |
Enter the Service Identifier Url. This value is present under EntityDescriptor tag, entityID property of your metadata XML file. For example: Example: https://42g.onelogin.com/trust/saml2/http-redirect/sso/651423 Fetch these values from the certificate downloaded in step no.7, Configure settings in onelogin server. For example: Example: https://42g.onelogin.com/trust/saml2/http-redirect/sso/651423 |
|
Logout Service Url |
Enter the URL for logout. For example: https://mr54live.onelogin.com/trust/saml2/http-redirect/slo/1035857 |
|
Roles |
Choose an option for the Roles from the drop-down menu. To know more see Configure Permissions for Role-Based Admin. |
|
Device Group Set |
Choose an option for Device Group Set from the drop-down menu. To know more, see Configure Permissions for Device Group Set Based Admin. |
|
Jobs/Profiles Folder Set |
Choose an option for Device Group Set from the drop-down menu. To know more, see Configure Permissions for Job Folder Set Based Admin. |
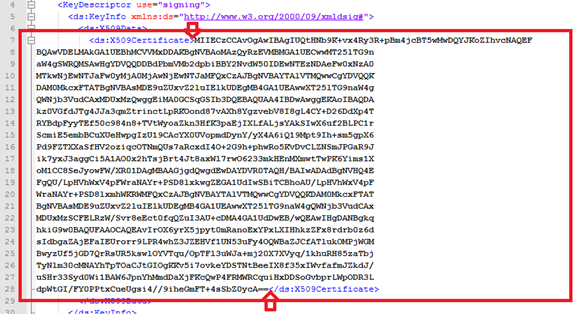
3. Copy the text value present inside EntityDescriptor > KeyDescriptor > ds:KeyInfo > ds:X509Data > ds:X509 Certificate and save it in a file with extension .cer.
4. Click Upload Certificate to Upload cer file.
Keep the password field empty. If Upload Certificate option is not visible and Download Certificate is visible instead, then delete the existing certificate and again upload the saved cer file.
5. Login to onelogin to login to the 42Gears UEM server.
For example: https://<SureMDM Server URL>/console/ssologin/<SureMDM Account ID>
![]() Note: Admin should enter their Server URL and Account ID into the above-mentioned URL.
Note: Admin should enter their Server URL and Account ID into the above-mentioned URL.